Jumping into Drumming: Where to Begin

Whether you have never played an instrument before or you’ve been playing the drums for years, figuring out exactly what to do or practice next can be a daunting task. But there are always some general areas of drumming to explore no matter your skill level. If you get stuck, try to practice some of the following concepts based around your current abilities.
For Total Beginners
Just starting out and never played an instrument before? Awesome! You have the most defined starting point.
Finding Time in Music
Before even picking up the sticks, it’s a good idea to learn some of the over arching fundamentals of music. The overwhelming majority of music that we hear and listen to can be counted in cycles of 4 beats. Everything we play as drummers relates to that underlying pulse. To demonstrate, check out Queen’s “Another One Bites the Dust” (we did a deep analysis of this song before). Try to clap along with the bass drum and snare drum on each beat. Can you feel the underlying pulse? This pulse is frequently divided into smaller segments, allowing musicians to play more expressive rhythms and layer together various patterns. When learning the drums, you’ll frequently encounter rhythms that break beats into 2 equal parts (8th notes), 3 equal parts (triplets), and 4 equal parts (16th notes).
The Basic Motions
Coordination is an especially important skill to develop for drumming and easy to practice, even without sticks or drums. Try tapping your hands on your lap at a steady, even pace, alternating between each hand. This simple pattern has an official sounding name: a Single Stroke Roll. Begin coordinating your hands with your feet by tapping your foot underneath the hand pattern. Tap your foot once for every two taps with your hands. If your hands are playing a steady rhythm, one hand should align with your foot, and your other hand should hit by itself, directly in between each foot tap. In technical terms, you’re playing quarter notes with your foot, and 8th notes with your hands. Count out loud along with your hands by using numbers for the strokes that land on the beats, and saying ‘and’ for the strokes that land between the beats. It’ll sound like “one and two and three and four and.” Altogether, you’re using three-way coordination (both hands and one foot). Look at you go!

While playing at the same pace with your hands, switch the pattern so you play two taps with your right hand, followed by two taps with your left (right right left left, etc.). These are known as double strokes. Both single strokes and double strokes are fundamental components to practically all styles of drumming. Most rudiments and rhythmic patterns boil down to some mixture of single strokes and double strokes so it’s best to practice them right off the bat!
An example of another basic rudiment is a pattern known as a paradiddle. Paradiddles combine a pair of single strokes with a double stroke grouping, creating a new pattern: [right left right right] [left right left left]. This rudiment will require a bit more practice so start as slowly as you need to in order to play the pattern consistently.
Try tapping your foot while playing single strokes, double strokes, and paradiddles along to some of your favorite music to begin developing a more solid sense of time. Once you feel comfortable with these basic concepts, it’s time to grab a pair of sticks.
If You’ve Played an Instrument
If you already have some experience playing another instrument, you likely have the basic coordination required to play in time between your hands, and possibly your feet to some extent, too. In that case, it’s time to pick up a pair of sticks and begin developing technique and stick control.
Holding the Sticks
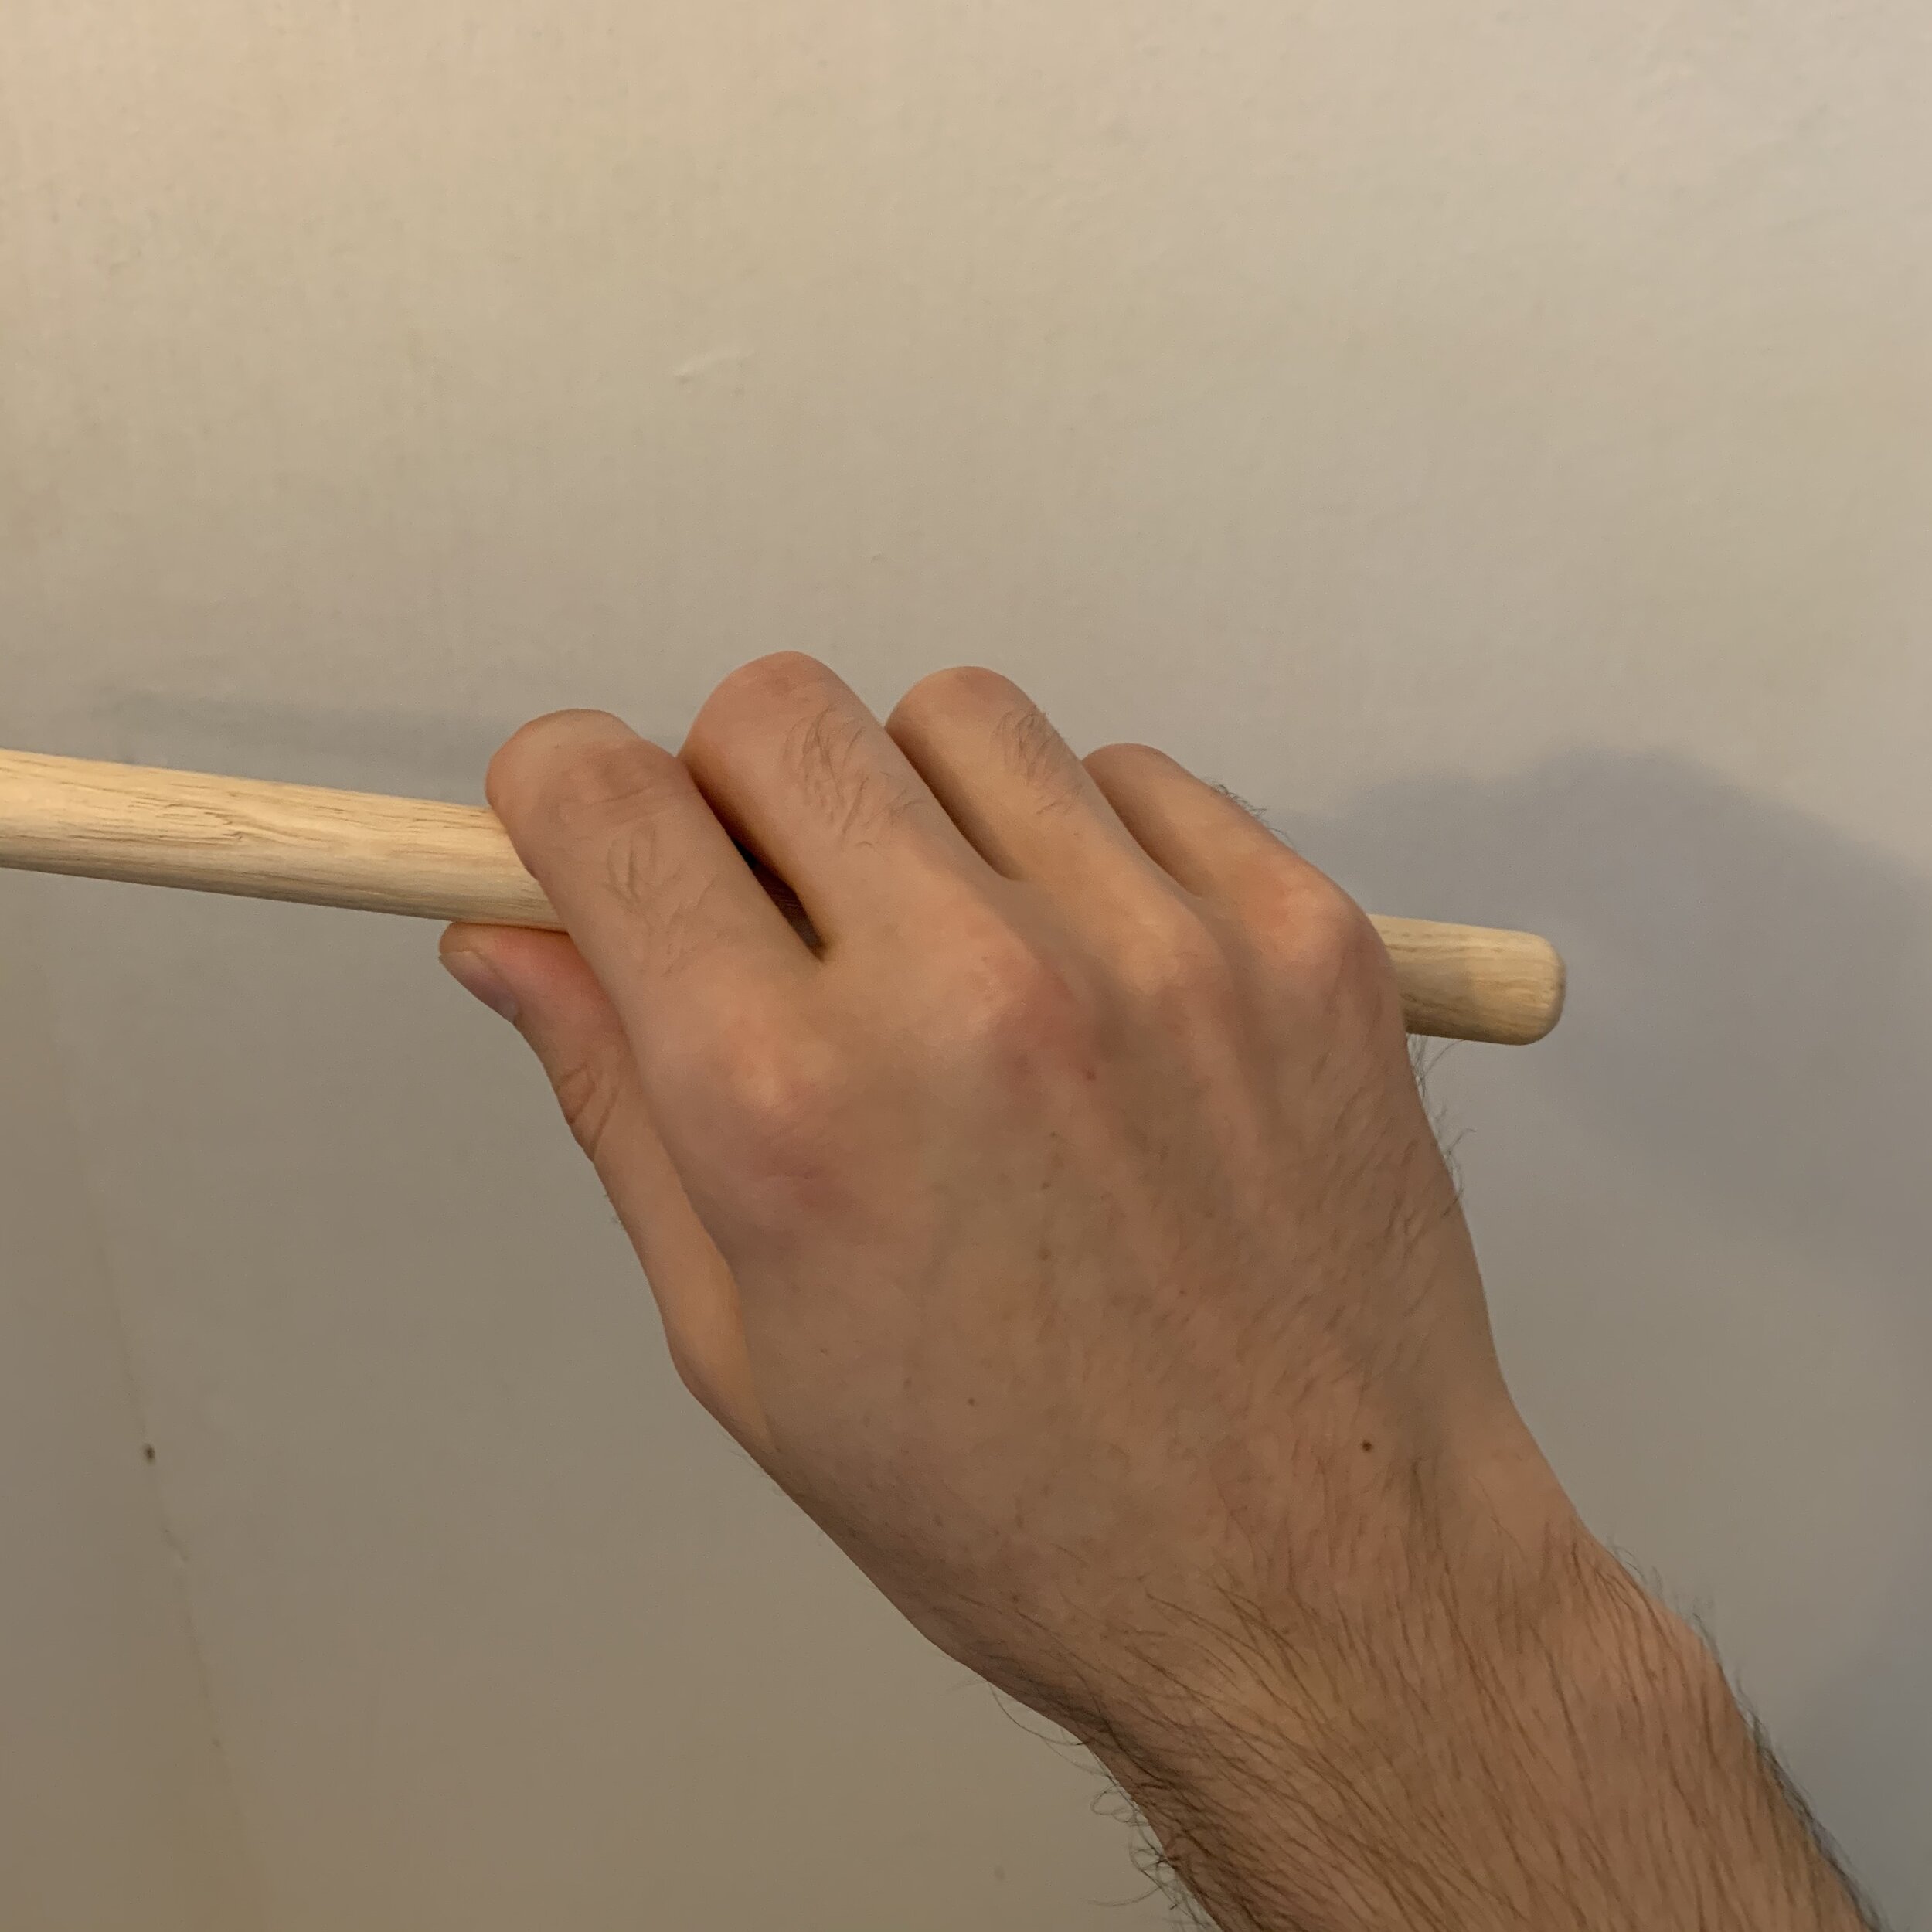
Good technique allows the stick to freely bounce up from drums and cymbals, making it possible for drummers to stay relaxed and play at higher speeds with a lot of power, but not much effort. Ultimately, technique is pretty subjective and will vary slightly from one drummer to the next, but there are some general mechanics to keep in mind. Drummers create a pivot point between the stick and their fingers, known as the fulcrum, by pinching the stick between their thumb and index finger (below left). Some drummers find it more comfortable to pinch the stick between their thumb and middle finger (below middle), or even their thumb and both fingers simultaneously (below right). Try them all to find what feels best for you!
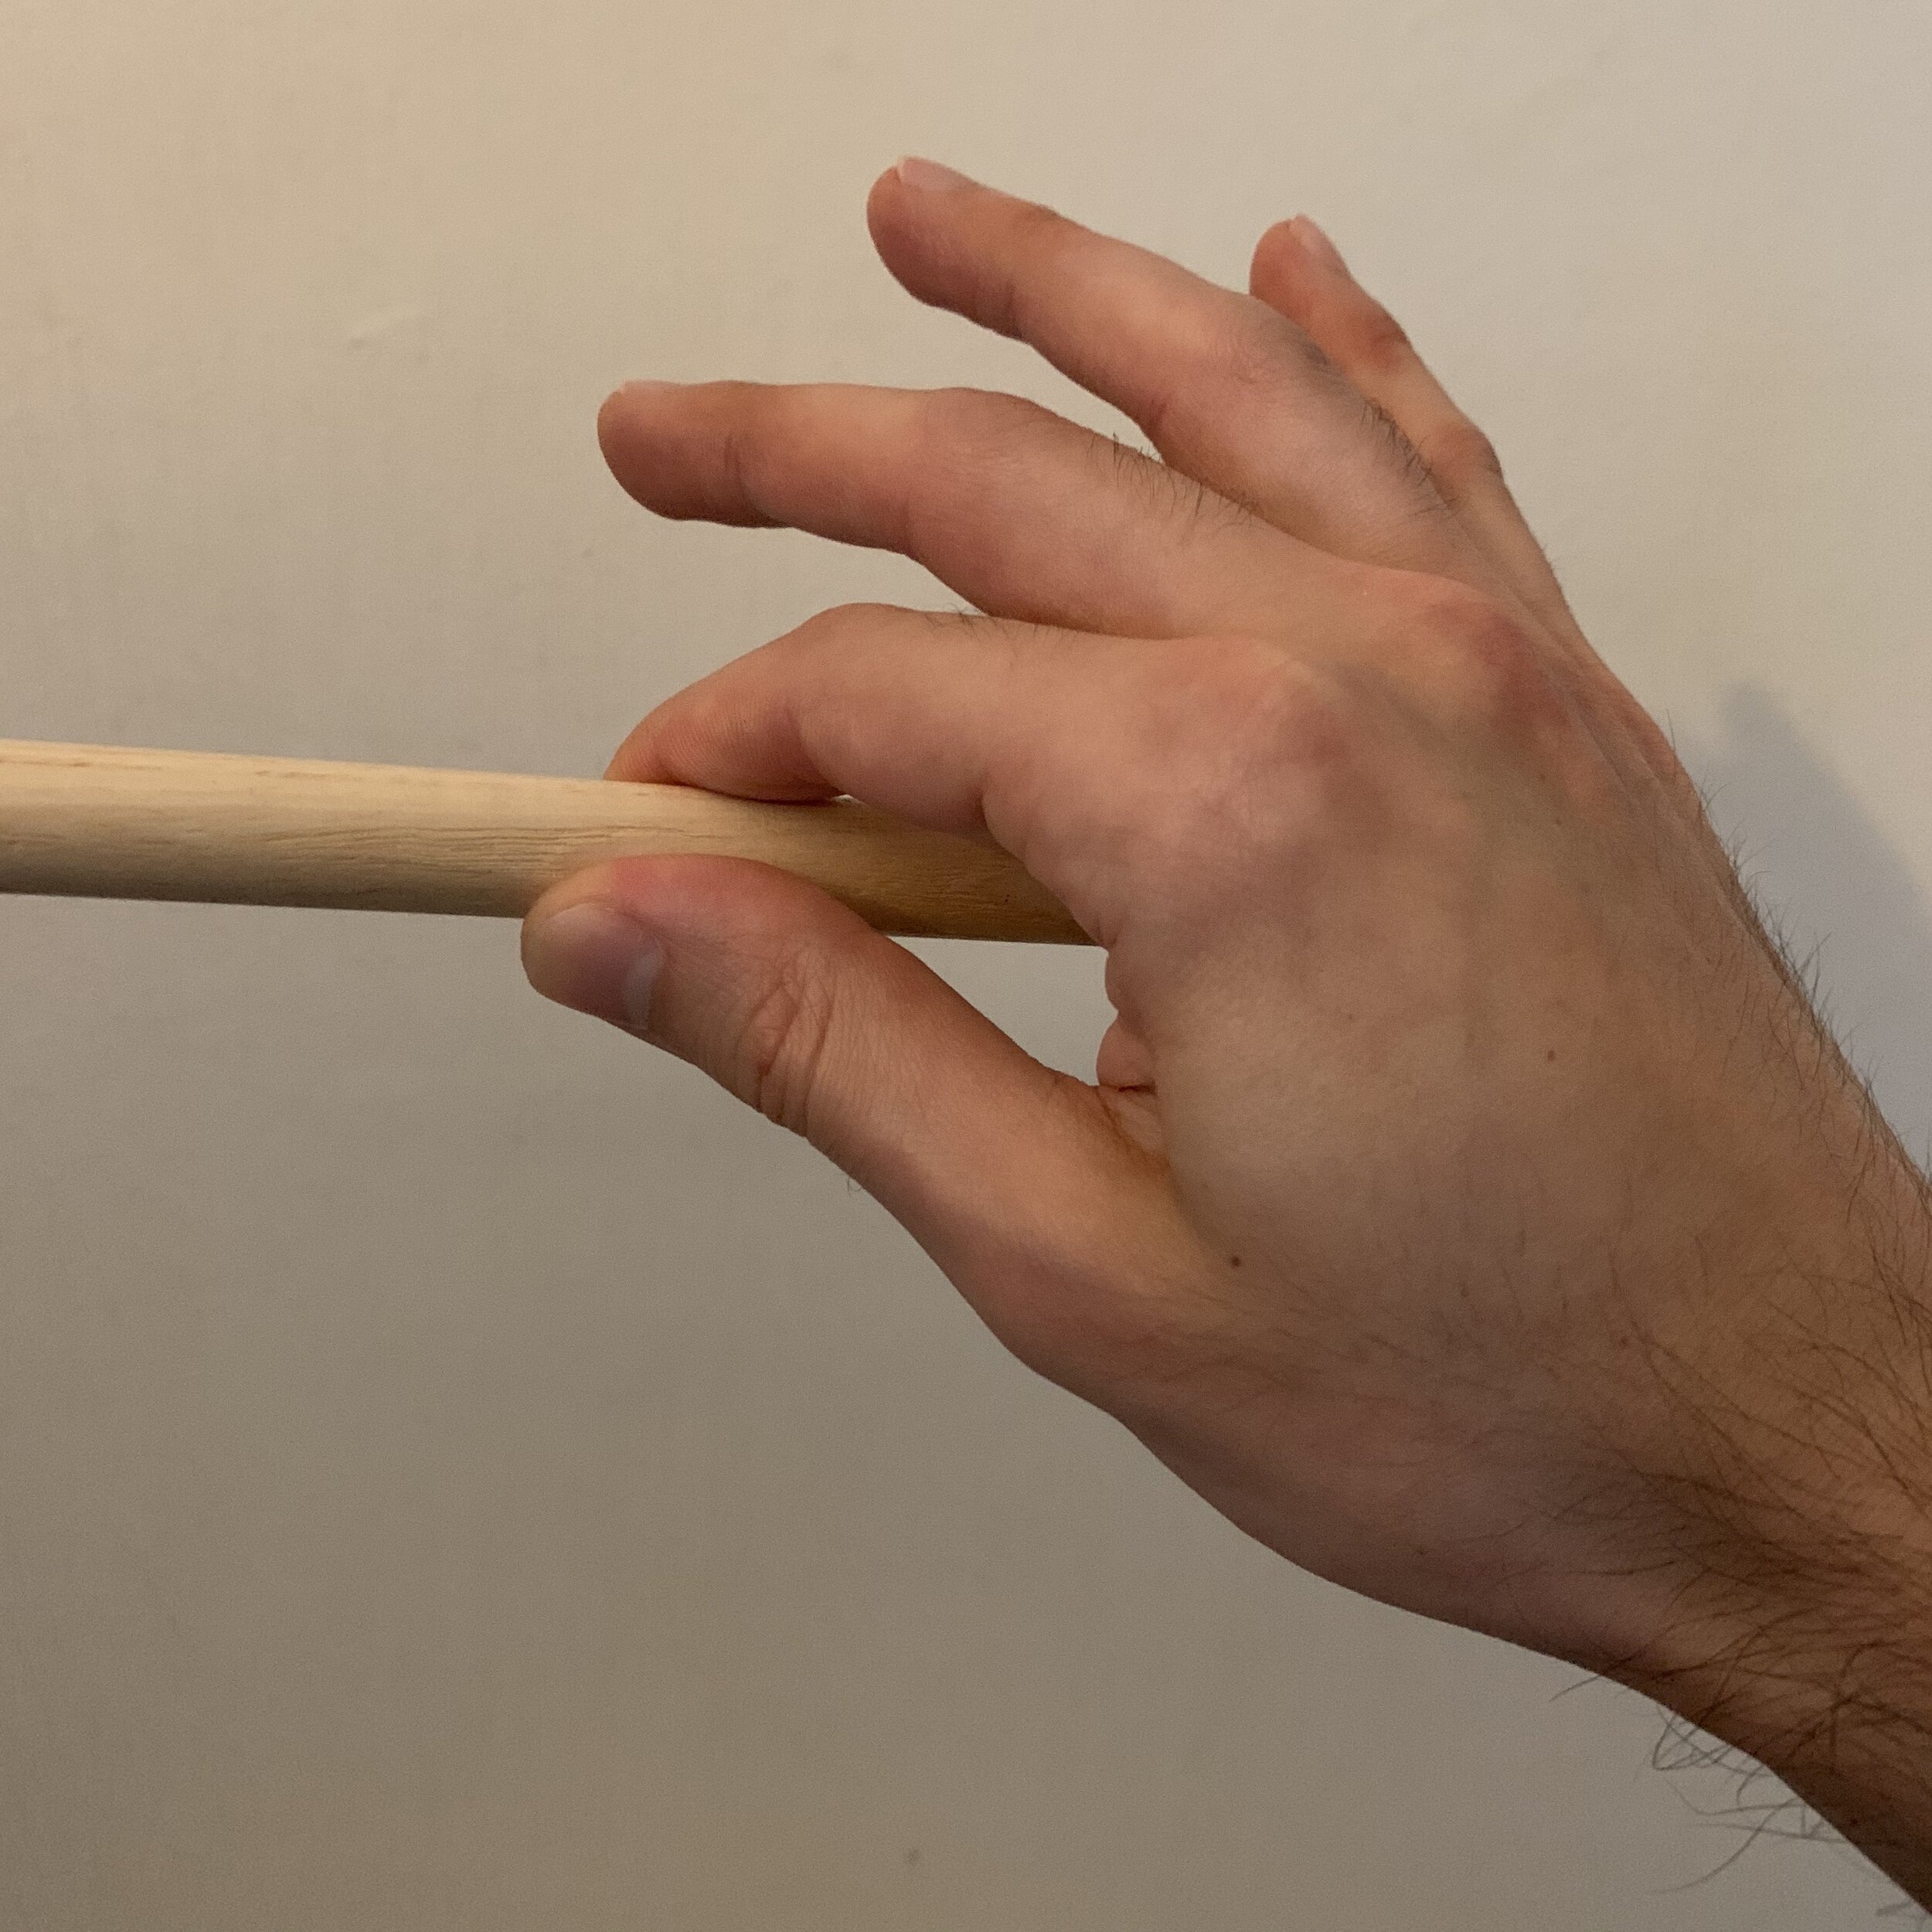
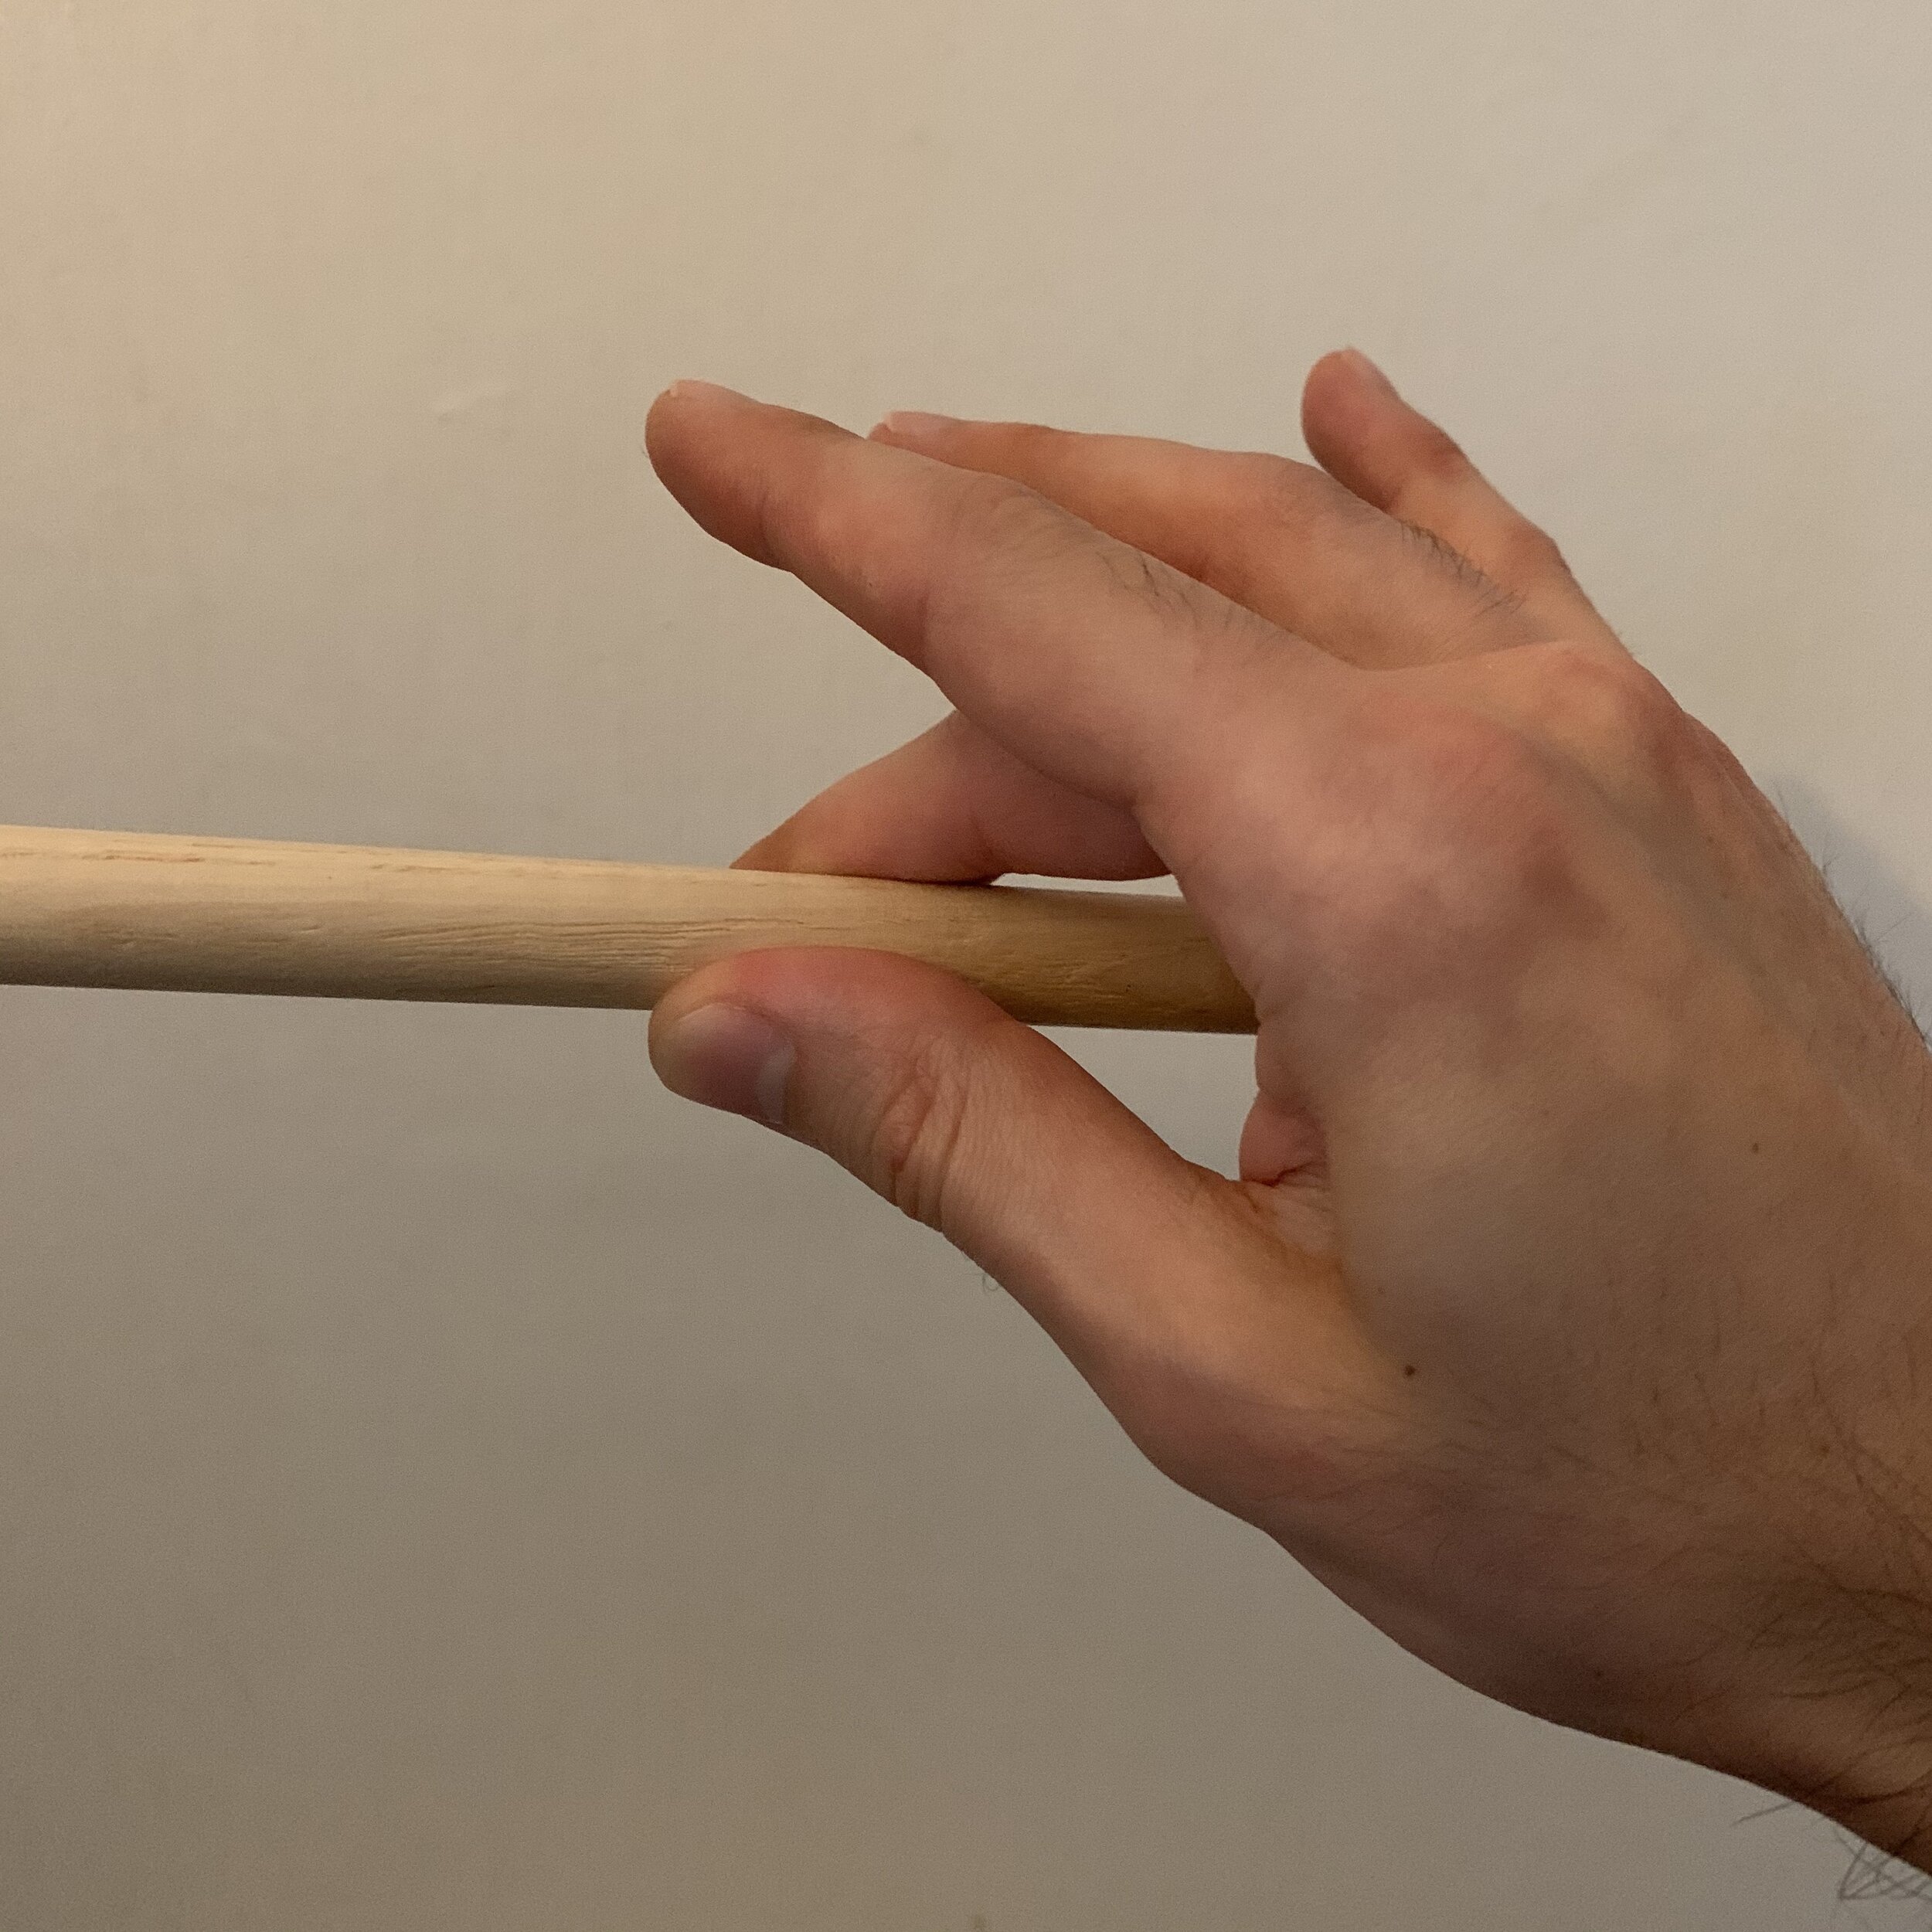
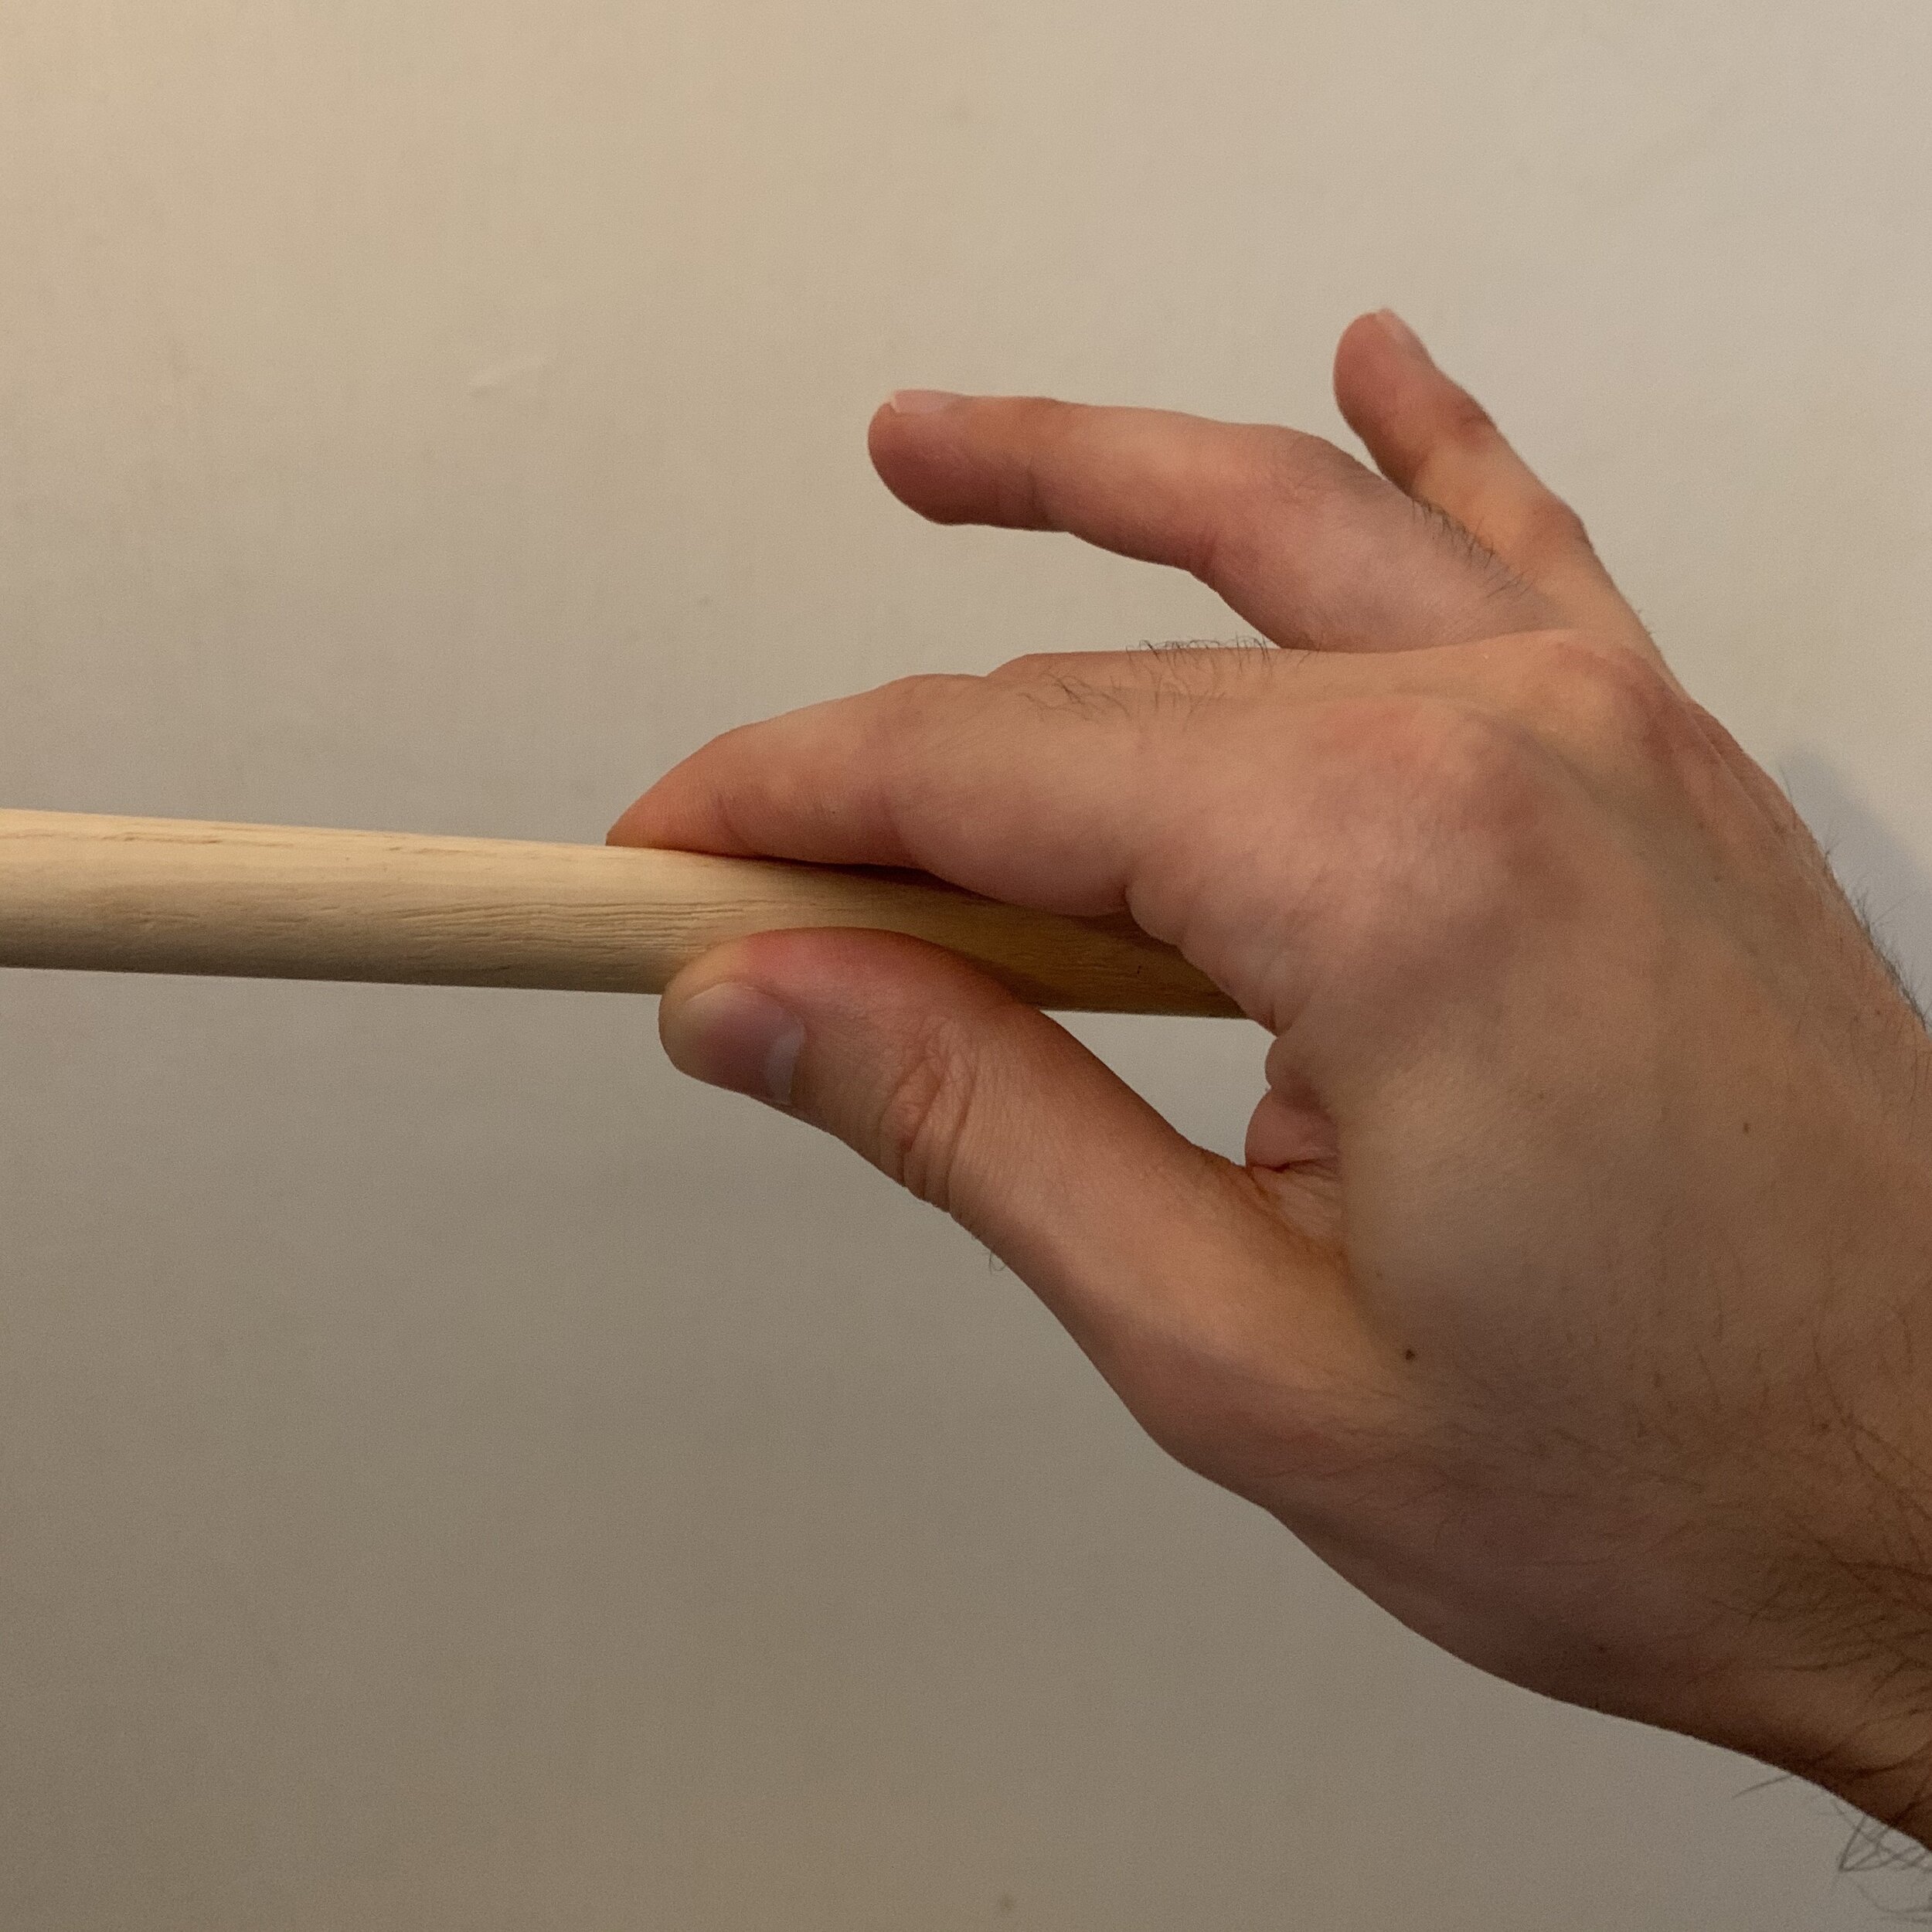
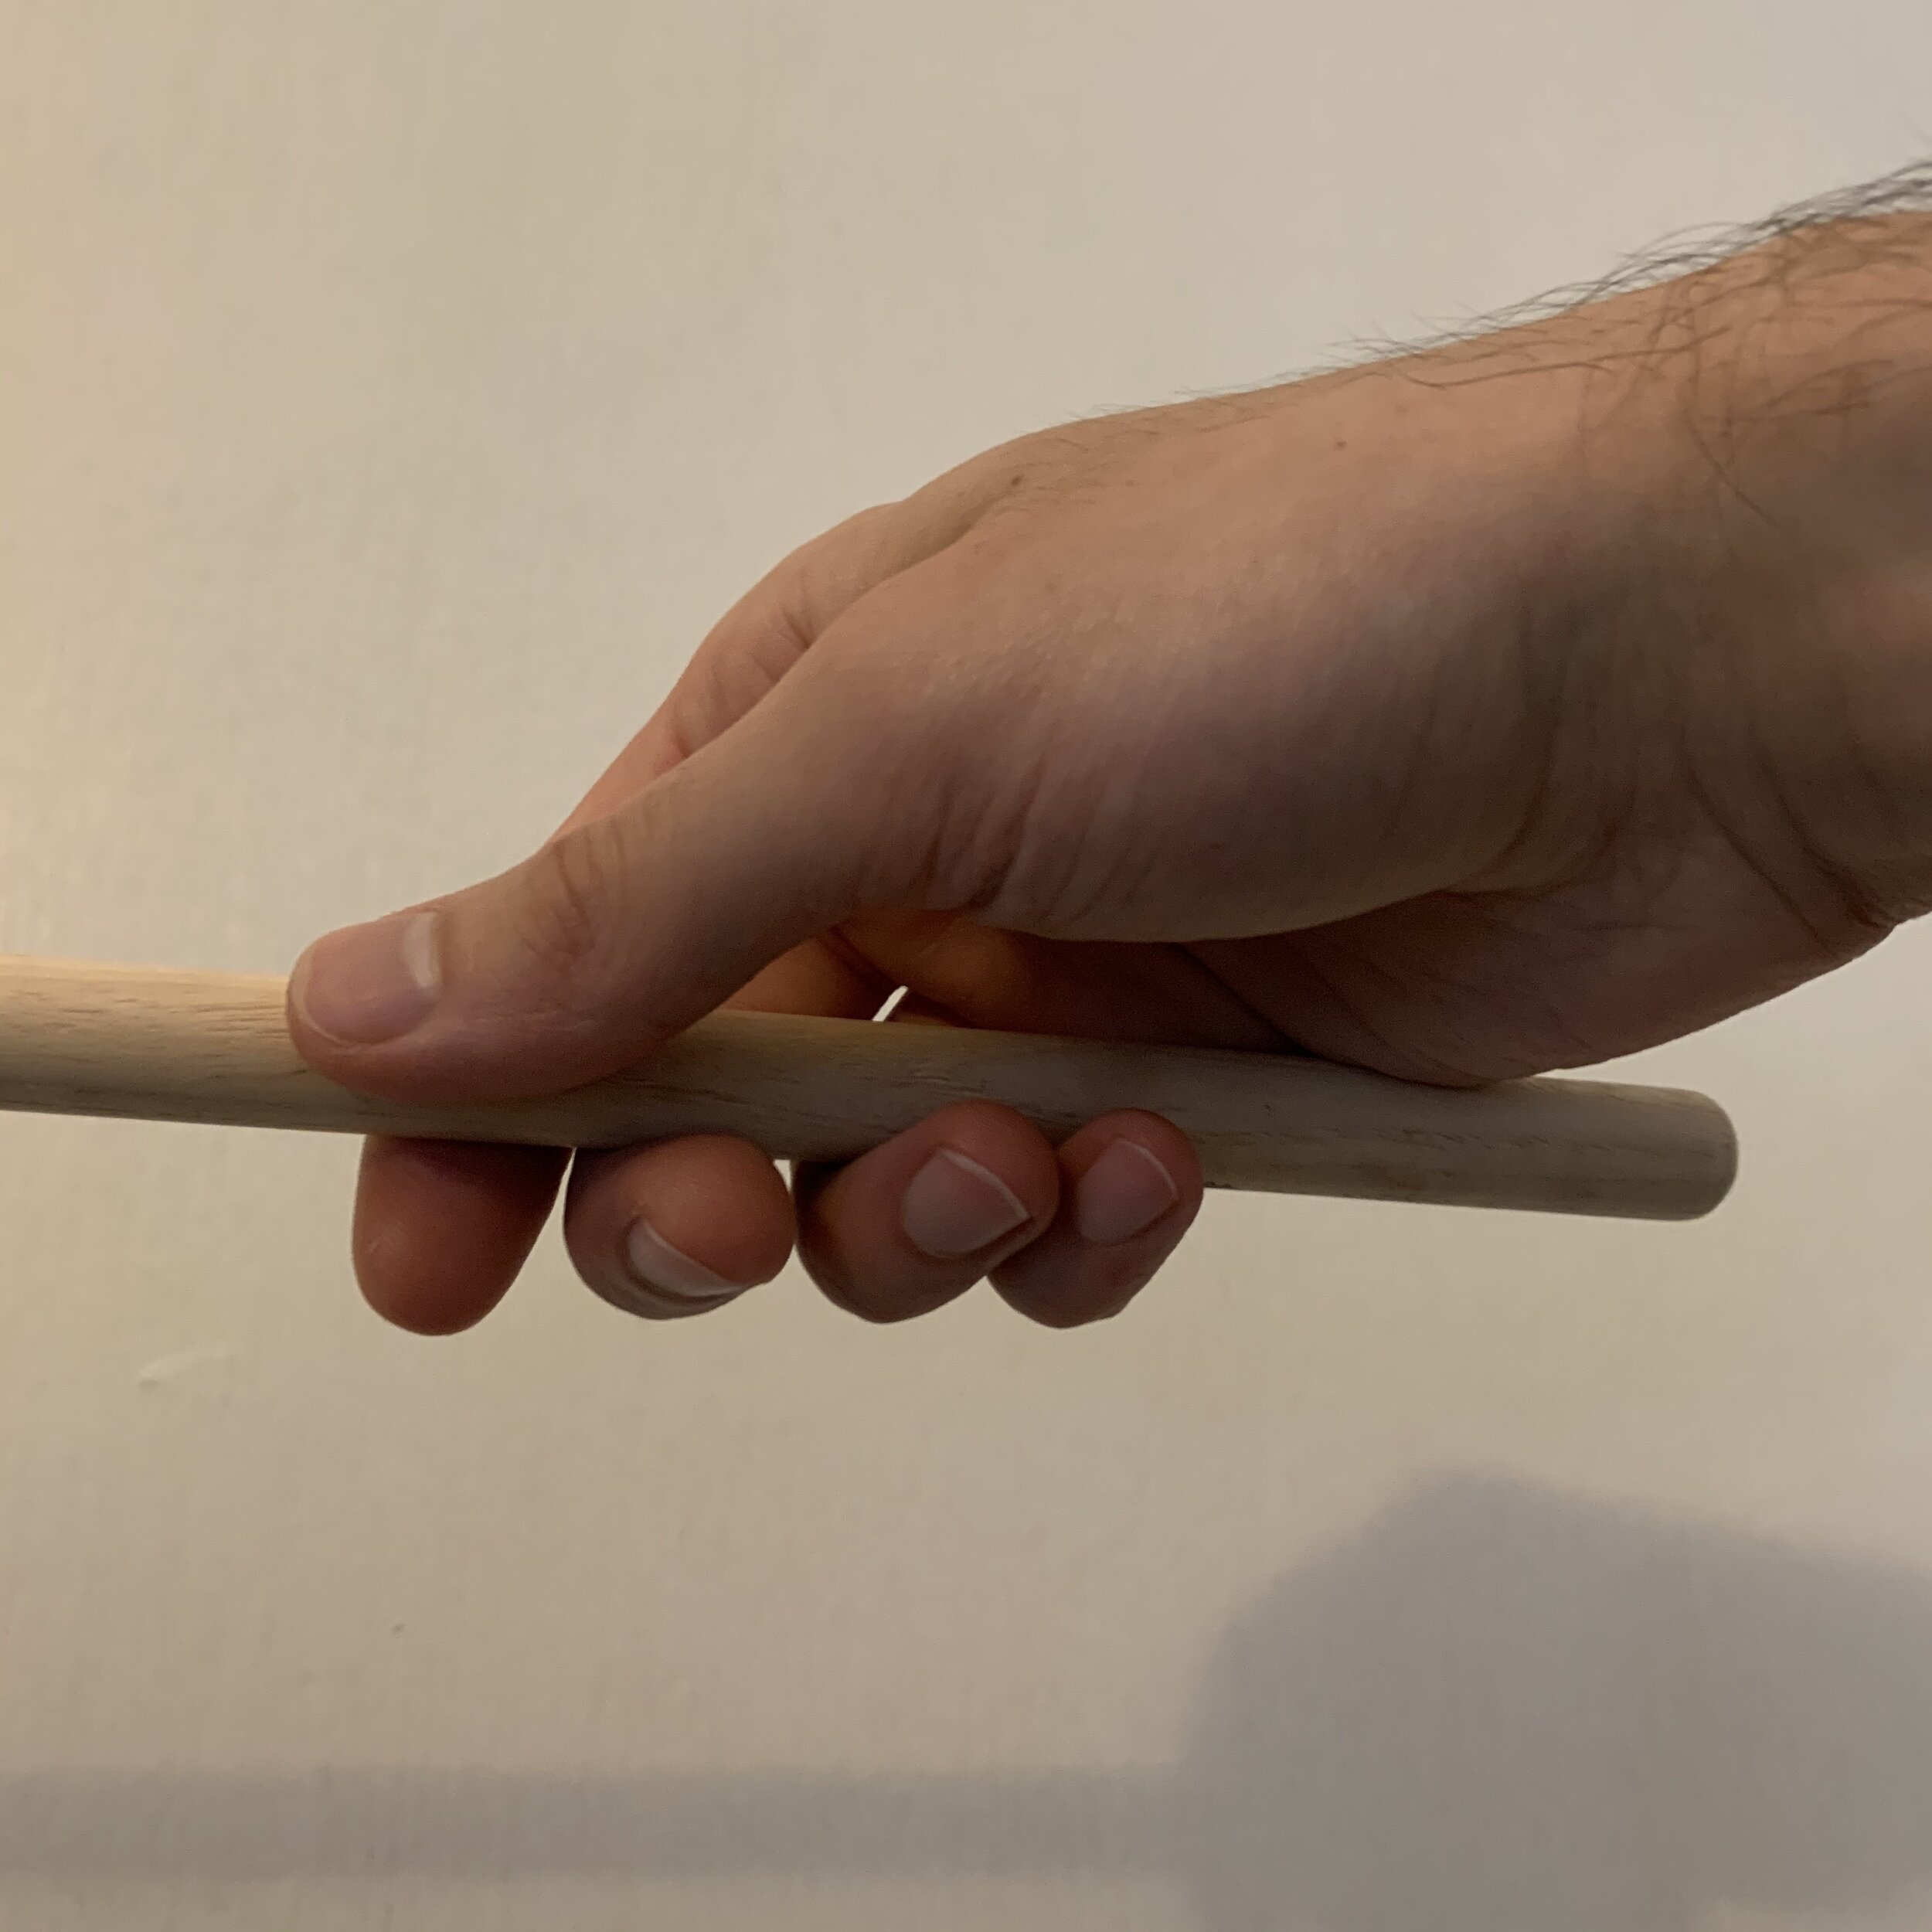
Once you have your fulcrum in place, gently wrap your remaining fingers around the stick. The back fingers should cradle the stick, not squeeze it (below left). Ultimately, the back fingers will allow you to better control the stick and help the stick move in a straight line. Your grip should always remain relaxed (easier said than done), allowing the stick to pivot in your fulcrum. We want to work with the sticks, not against them! The middle and right pictures below show a top-down view of proper grip, and an “under the hood” view respectively. Make sure both hands hold the sticks exactly the same way!

To begin getting the feel for technique, begin playing single strokes (alternating hands) on a surface with a lot of rebound, preferably a practice pad or a snare drum. Don’t push the stick into the surface, as if you’re hammering a nail. Instead, throw the stick using only your wrist so it rotates in the fulcrum. The motion is very similar to knocking on a door. If done correctly, you should feel the stick bounce off of the playing surface. If you squeeze the stick too tight, it won’t bounce back to you. At first, you may find it tricky to prevent your hand from impeding the stick on its bounce back up. But with a bit of practice, you’ll begin to develop a sense for the appropriate amount of pressure to place on your stick grip.
When you feel comfortable playing steady single strokes, begin practicing other basic rudimental patterns with the sticks, such as double strokes, single paradiddles, and paradiddle-diddles [right left right right left left / left right left left right right].
Building Beats
If you have a drum set and a good grasp on holding the sticks, hitting the snare drum, and a few basic rudiments, then it’s time to learn a couple basic beats.
We’ll start with a simple rock beat. This type of groove is the foundation for many different styles of music beyond rock, including funk, metal, hiphop, EDM, and more. Begin by playing steady 8th notes on closed hihats (make sure to press down hard on the pedal to prevent the hihats from getting too loud). These 8th notes will remain constant. Next, play the backbeats on the snare drum by hitting directly on beats 2 and 4. Both hands will strike at the same time on the backbeats. Don’t stop playing the hihats to make way for the snare drum! Last but not least, play the bass drum on beats 1 and 3. The bass drum and hihats will hit at the same time on those beats. Blending the tones from each part of the drum set is important to make the groove feel good. With a beat of this style, the kick and snare should be more pronounced than the hihats.

It’s also good to learn a basic swing pattern, since swing drumming is practically the oldest style of drum set playing and is the grandparent of all modern drumming. A swing pattern also brings about the concept of swung time, where 8th notes aren’t evenly divided. Instead, the first 8th note of a beat is elongated, while the second 8th note is shortened a bit. The resulting rhythm has somewhat of a limp to it (doo-da doo-da as opposed to da-da da-da). In more technical terms, the swing feel is built on a triplet subdivision (beats are broken into 3 equal parts).
Unlike the basic rock beat, the fundamental swing pattern has no snare drum or bass drum. Its driven entirely by the cymbals. On the ride cymbal, begin by playing only quarter notes. When those quarter notes are locked in, begin closing the hihats with your foot on beats 2 and 4. Step down on the pedal like you’re squishing a huge bug to achieve an articulate “chick” sound. Finally, add another stroke to the ride cymbal pattern at the very end of beats 2 and 4. Altogether, the ride cymbal pattern should sound somewhat like “ding ding da-ding ding da-ding” (counted as 1 - - 2 - a 3 - - 4 - a). Refer to Miles Davis’s “So What” for an exemplary demonstration of the swing pattern. Jazz drummers frequently improvise patterns between the bass drum and snare drum while maintaining the cymbal pattern on the ride and hihats, but doing so requires higher levels of coordination and control.

Once you feel comfortable with these basic beats, you can begin learning simple songs to expand upon these fundamental concepts.
If You Already Play the Drums
If you already know how to play some basic beats and have a solid foundation, then the next step could go in many different directions. You could ramp up the complexity and difficulty of patterns and beats, explore different styles of music you don’t know much about, learn to write your own drum parts, dig into more advanced techniques, or enter the realm of improvisation. In other words, you need to set some goals, which will then influence your next moves. But let’s focus on just a couple of those potential topics.
Taking Coordination up a Notch
Lots of music can come from simple 8th note rhythms, but smaller beat divisions, like triplets and 16th notes, open up an entirely new world of expressive possibilities. Incorporating smaller beat divisions into grooves requires a higher level of coordination and control.
Building upon the basic rock beat presented above, let’s try to layer in a few 16th notes with the bass drum and snare drum. First, play the snare on the last 16th note of beat 2 (the ‘a’ of the beat) in addition to hitting on beats 2 and 4. That single additional 16th stroke will land between two strokes on the hihats, adding a bit more dimension to the groove. Try to play that 16th note quieter than the other snare strokes so it doesn’t interfere with the backbeats. Next, add a kick stroke to the ‘a’ of beat 3. The additional kick should also land between two strokes on the hihats. Splitting your hand from your foot might take a good bit of practice to get the feel for, so begin by playing very slowly to prevent those two limbs from aligning on that one 16th note. From there, layer in 16ths on the snare and kick however you please, but make sure to keep those 8th notes steady on the hihats!

While there are lots of grooves drummers can play using only their hands and bass drum, more advanced players are able to incorporate all 4 limbs simultaneously. Using every limb is essential for providing rhythms with more depth and texture. To begin dabbling with 4-way coordination, start with the basic rock beat from above, but play the steady 8th notes on the ride cymbal instead of the hihats. Doing so frees up the left foot to use the hihat pedal. While playing the groove, step on the hihat pedal on each beat. Playing with both feet at the same time might throw your balance off a little so maintain good posture to prevent yourself from swaying around on the seat.

If you feel balanced and can lock in your hihat foot, try to layer in some 16th notes on the bass drum and snare drum. Eventually, your hihat foot will run on autopilot and will better support anything you play.
Creating on the Fly
Learning specific grooves and patterns is an essential step in becoming a more self-sufficient drummer, but improvising and reacting to other musicians in a group setting is a higher form of ability. In order to improvise, drummers need to have the basics down to the point they don’t even need to think about them. Ideally, they’ll also have developed enough technique to elicit a wide range of sounds and inflections from the drums and cymbals. Interacting with other musicians requires drummers to listen to everything surrounding them instead of focusing on just the drums. But how does someone practice improvising?
There isn’t any single correct answer to that question, but a good place to start is with some good ol’ fashioned Call and Response. For example, play a short rhythmic phrase on just the snare drum. Think of this initial statement as the “call.” Play the same rhythmic phrase again, but on any other drum or cymbal aside from the snare. This second phrase is the “response.” Keep playing the same “call” on the snare drum, but alter the “response” by changing the rhythm slightly or orchestrating it over several drums and cymbals. This approach is an excellent way to expand upon a single idea and develop a full-blown drum solo. You can start with the examples given below.
We can also apply the same concept to grooves, which is ideal for jam sessions where the drums aren’t the center of attention. To leave yourself room to expand, start with a very basic beat for your “call.” That rock groove from before would work just fine. As a “response,” make minor alterations to the original beat. Start simple by maybe adding an additional 8th note on the bass drum, or a 16th on the snare drum. Returning to the original “call” groove always gives the listener something familiar to latch onto, while the variety of responses keeps them on their toes. For a more detailed breakdown of this approach, check out this blog post.
Other Directions to Take
Beyond the concepts mentioned and explained above, there are countless areas of music and drumming to explore. Certain styles of drumming, like jazz fusion or Afro-Cuban, make use of much more challenging rhythmic concepts, such as odd time signatures, polyrhythms, metric modulation, and syncopation. To become a versatile drummer with the ability to play whatever pops into your head, taking a look into these numerous styles and concepts is a must, even if you don’t master them all. You may find inspiration in places you’d least expect!
Want to gain a clear, individualized path forward in your drumming journey? Schedule a trial lesson to get closer to your goals!