
Self-Sufficient Groove Development

So you walk into a jam session, sit behind the drums, make sure everything is dialed in, and kick off your go-to groove. The bass player seems into it, the guitarist finds a melody to riff on, and the keyboardist is ripping some funky chord jabs. But a few minutes go by and you find yourself repeating the same beat over and over and over. You try to change it up, but have absolutely no idea what to do aside from what you’re already doing. The other musicians are starting to look a bit bored. In an attempt to save the jam, you do what any rational drummer would and you flip the sticks high into the air, except you totally miss both sticks and fall backwards off the throne in your efforts to dodge the projectiles. The music abruptly stops. Everyone points at you and laughs. You’re humiliated. If only you knew a process to further develop a groove to prevent yourself from getting trapped in the same idea… Thankfully, such a process exists.

To conceptualize this groove development process, think of it as a wheel with spokes jutting out from the center in all directions. The very center of the wheel will be your “home base” groove. All of the spokes jutting out will be variations and developments of the “home base” groove. By making small changes to a simple groove, we’ll discover specific elements to tweak in order to expand upon an idea. We can add more strokes on the bass drum, we can add ghost notes to embellish backbeats, we can displace backbeats away from beats 2 and 4, we can change up the hihat pattern, or even open the hihats to get different inflections. That’s a lot of options! With enough practice, you’ll be able to run through this process in real-time.
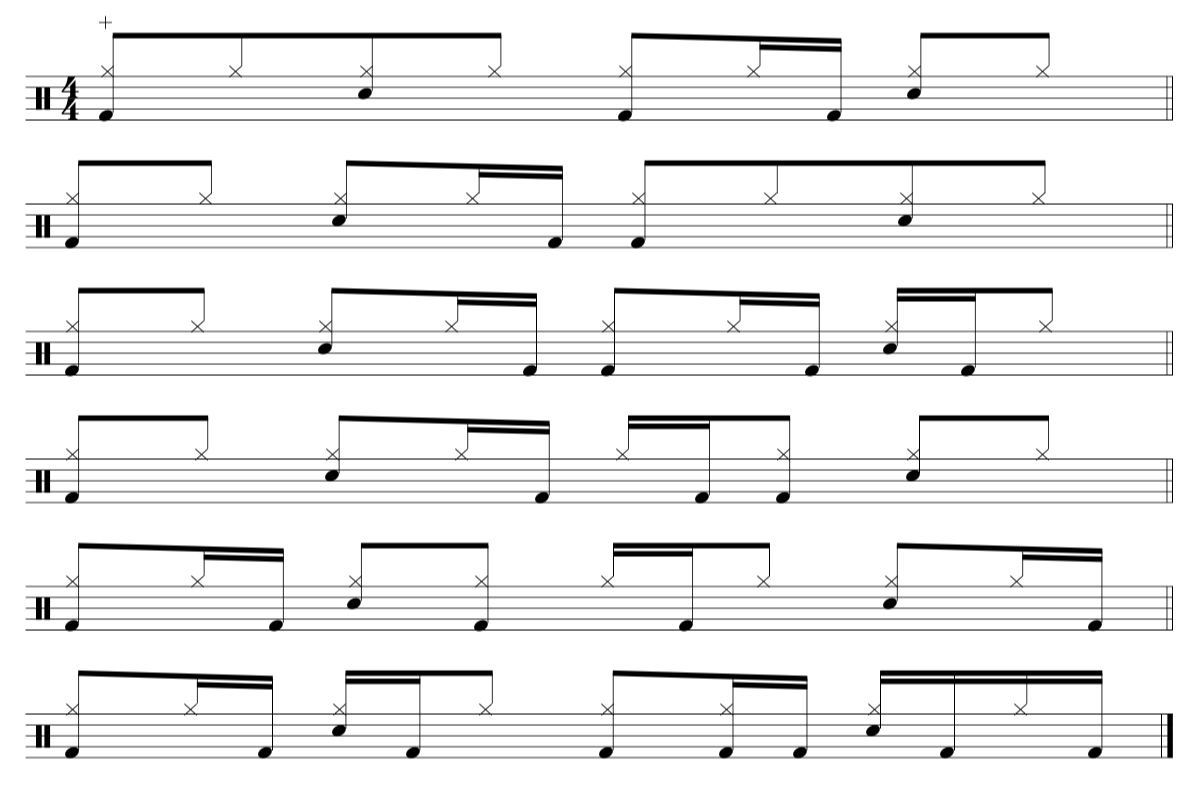
Start with a super basic rock groove, like the one pictured just below: 8th notes on the hihats, kick on beats 1 and 3, and hit the snare on beats 2 and 4. Beginning with a simple pattern leaves ample space to expand.

First, make simple modifications to the kick. We can move the kick to different parts of the beats, or we can add some extra 8th notes. Below are a few 8th note bass drum variations. To practice, alternate between playing the “home base” groove for one measure, followed by one of the variations. Always return to the central idea between each variation, creating several two-measure phrases. Cycling through each variation gives the feeling of expansion and development, even though you’re making only small modifications to the main pattern.

Next, we can embellish the backbeat by placing some ghost notes in the groove. Start by adding a ghost note only to the ‘a’ of beat 4. It’s a small addition, but begins to add dynamic contrast to the groove. We can also add ghost notes to the ‘e’ or ‘&’ of beats to create more dynamic layers. Use the backbeat embellishments in conjunction with the kick variations from above to get the most out of these patterns.

Some combinations with 8th note kick variations . . .
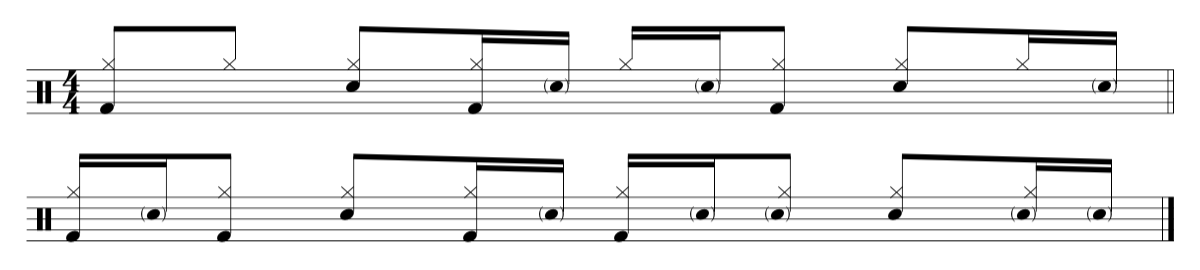
To get into more rhythmic variety, begin adding bass drum to 16th beat partials. Start simple by adding kick to the ‘a’ of beat 3. Placing kicks on 16th partials can drastically change the feel of the groove by bringing about syncopation. Combine the kick variations below with the backbeat embellishments to get some really functional grooves.
Some combinations with ghost note variations . . .

Another way to develop the “home base” groove is to displace the backbeats. Instead of always playing the snare right on beats 2 and 4, we can accent the snare just before or after those beats. Doing so is common in a lot of funk and jazz fusion music, and completely changes the feel of a groove. The first variation starts by displacing the snare to the ‘&’ of beat 3. From there, the backbeats move to the ‘&’ of beat 4, the ‘a’ of beat 3, and the ‘e’ of beat 4.

Some combinations with ghost notes and 16th note kick variations . . .

So we explored how to expand upon an idea by adding more kick and snare, but we can also change up the hihat pattern. Instead of always playing 8th notes on the hihats, we can play every 16th note with one hand, we can play 16th notes with both hands on the hihats, we can just play quarter notes, or we can play 3-16th note patterns. Opening the hihats within a groove is another tonal option to explore. Simply combine any of the above variations with the below hihat patterns to create functional, developed grooves.

Each of the above examples only explores developing a groove between the kick, snare, and hihats, but we can further explore by playing on the ride cymbal, which frees up the hihat foot to play another component that we can develop. And even on the ride, we can explore various tones between the bell and body of the cymbal. By always relating each variation to the “home base” groove, we can give ourselves numerous pathways to explore and develop without having to worry about reciting specific patterns. With enough practice, you’ll develop more of a “drummer brain,” which allows you to more quickly determine which ideas will work well in a given musical setting, and which ideas don’t necessarily fit. Trial and error is a truly powerful teacher!
To create a more solid plan to develop your “drummer brain,” schedule a trial lesson with one of our awesome instructors!