The Anatomy of a Bass Drum Pedal

The entire concept of drumming is quite primitive; hit drum, make sound. But when it comes to playing drums with your feet, much more complex mechanisms are required beyond holding a stick between your toes and going at it. Perhaps you’ve taken it for granted, but the modern bass drum pedal is a feat of engineering.
A Brief History
Before the drum set, drummers often performed in a percussion section. One person would play snare drum, another would play a bass drum with a mallet, and another would handle all of the other contraptions (traps), such as crash cymbals, suspended cymbal, triangle, tambourine, ratchet, etc. As motion pictures began to emerge and gain popularity toward the end of the 1800s and beginning of the 1900s, musicians were frequently employed to provide a soundtrack. The ability to synchronize recorded sound with film wouldn’t emerge for roughly another two decades. To save space in movie house pit orchestras, a technique known as double drumming came to use, where one drummer would simultaneously play bass drum and snare drum with sticks. But that restricted the drummer’s ability to play more expressively, especially on the snare drum, since each hand was occupied. The logical solution was to free up the hands by working out a way to incorporate the feet.
The first functional spring-loaded bass drum pedal was produced by Ludwig back in 1909. A few other percussionists and instrument manufacturers attempted to create their own kick pedals leading up to Ludwig’s design, but they weren’t responsive enough for any practical use and were never widely adopted. Almost all kick pedals today employ the general mechanics of the original Ludwig design.
However, getting a bass drum pedal to respond well and feel good requires an understanding of the different components and settings. Let’s dissect a Tama Speed Cobra to better understand how a kick pedal functions.
Getting to Know Your Pedal
Important note: each pedal manufacturer has their own designs and models, but they generally work the same way and have the same adjustable components. Your pedal may not have every single component pictured below, and that’s fine! Some pedals have a few extra bells and whistles that allow users to really dial in how they respond.
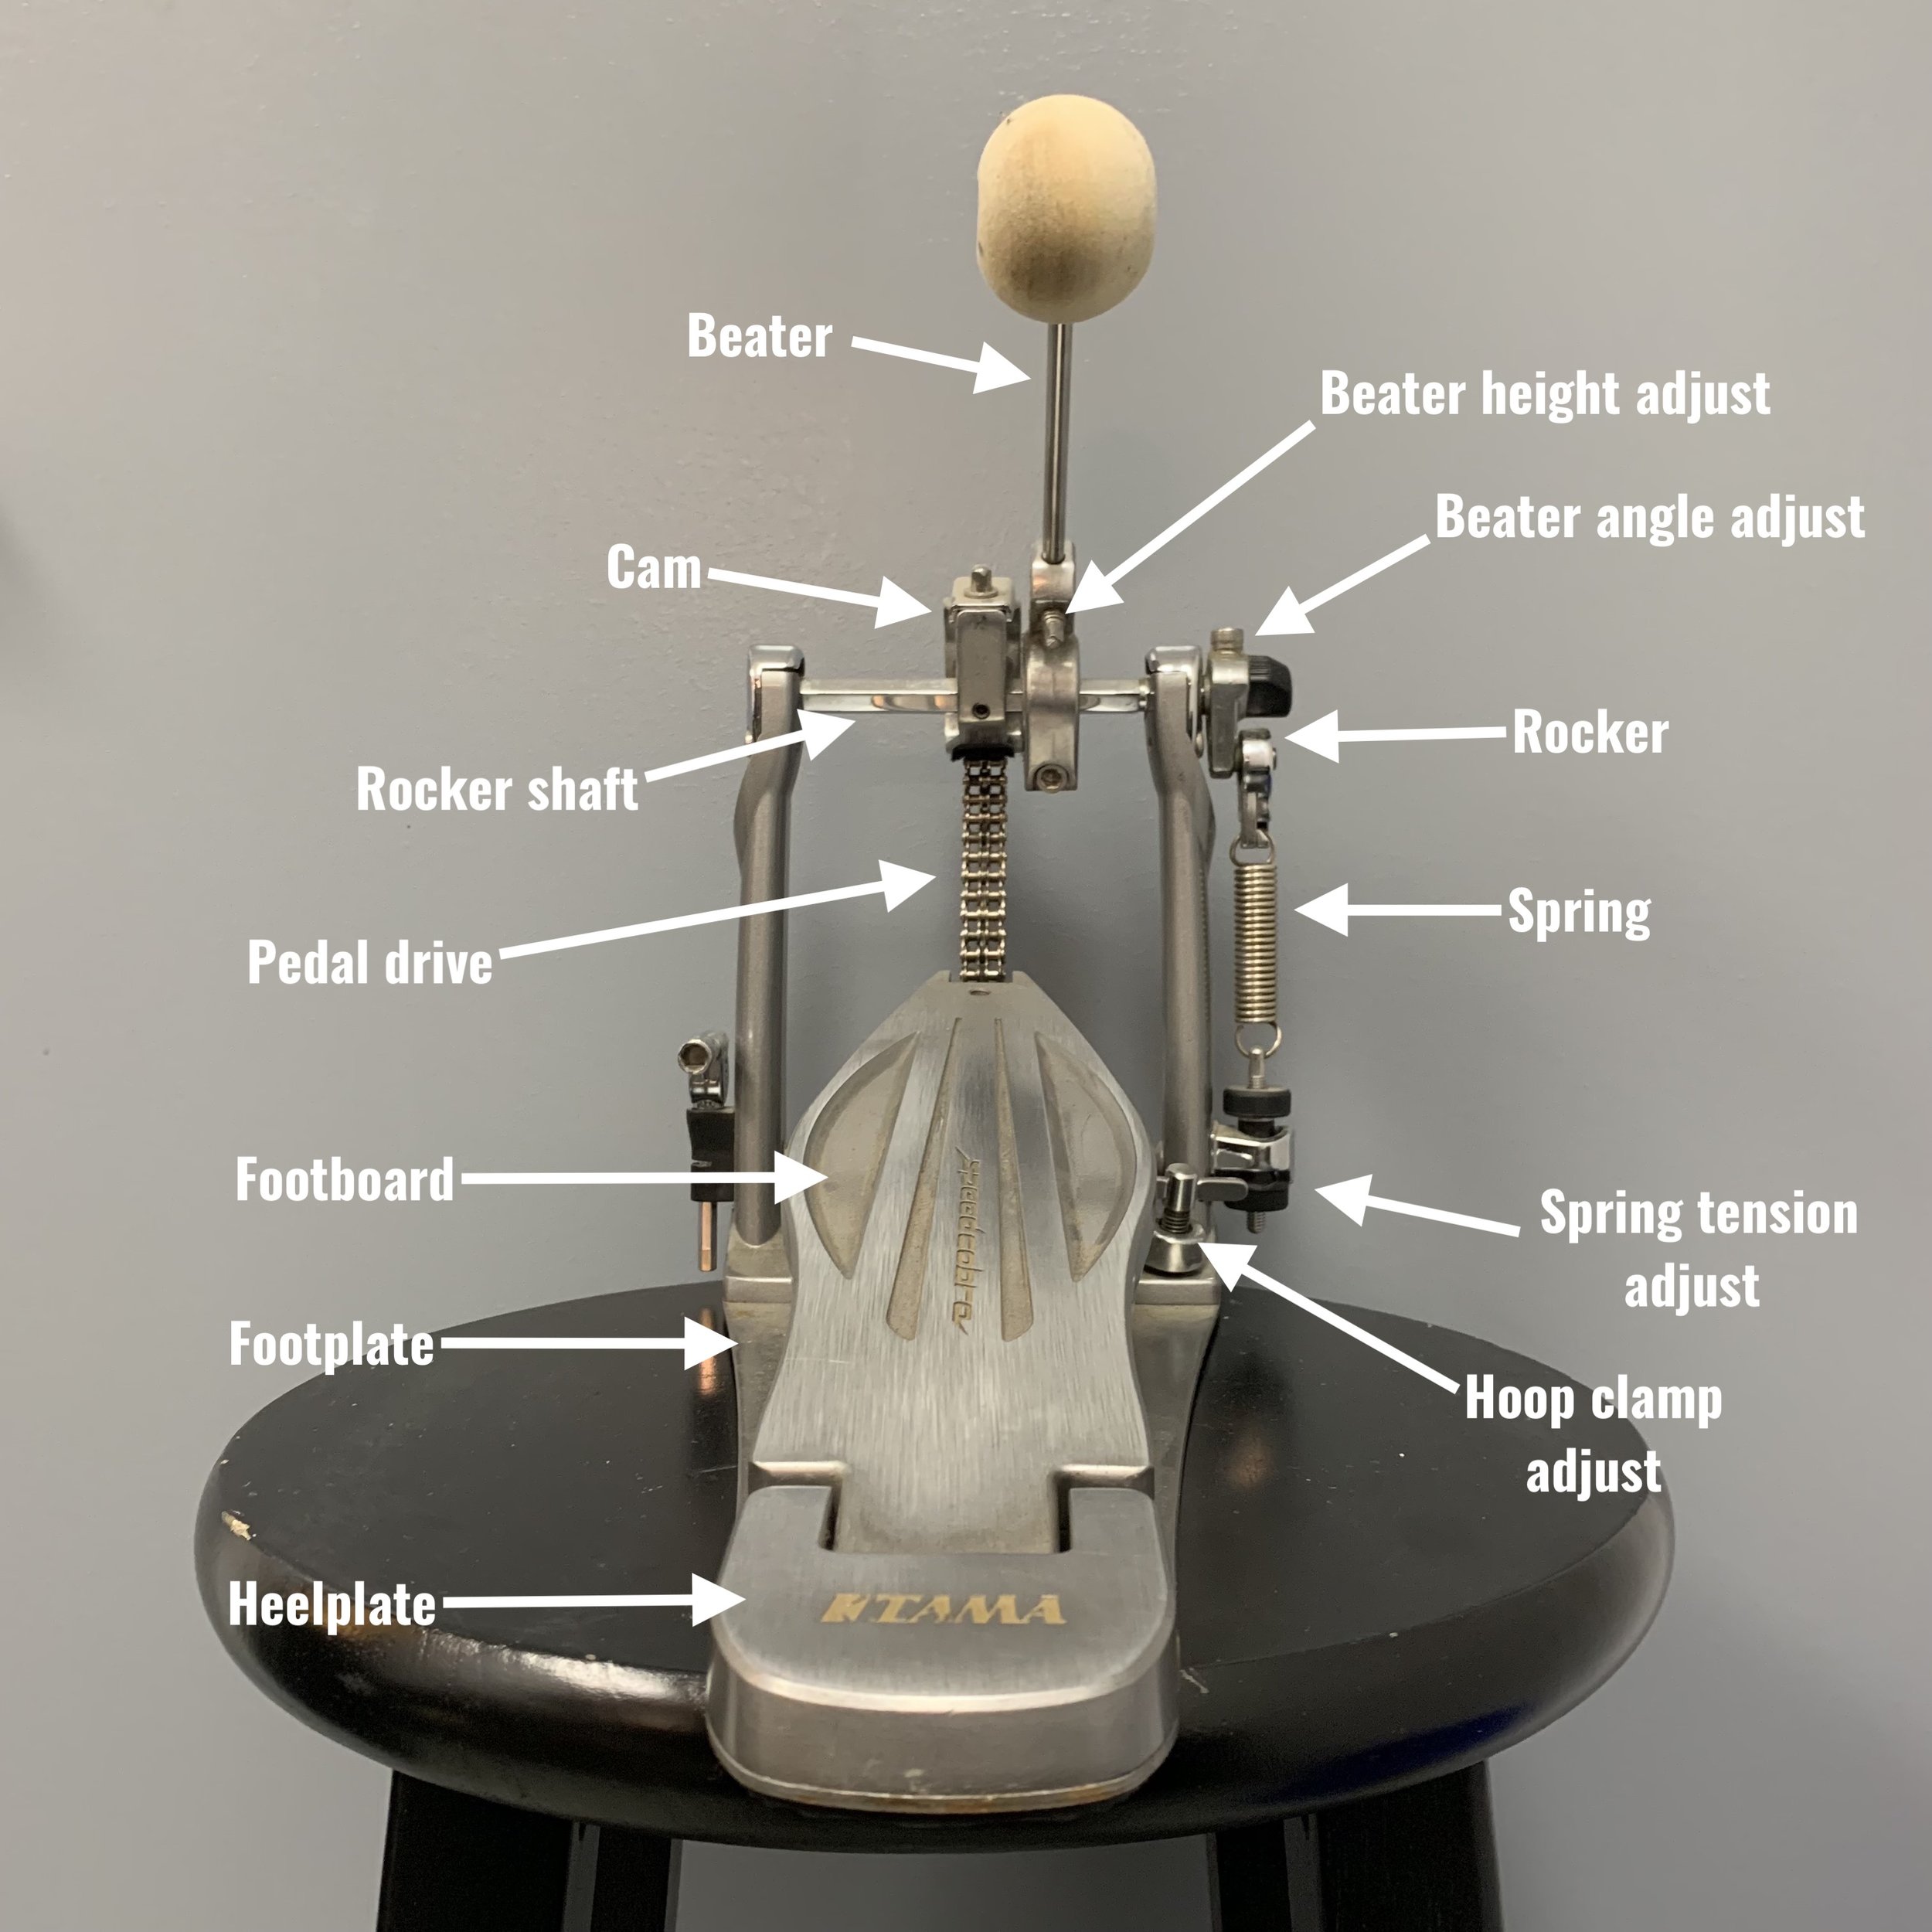

Here are all of the pictured components and their function in alphabetical order:
Beater - the small mallet that strikes the bass drum. Most have a felt surface, but some use rubber, plastic, or wood to create different sounds. The weight of the beater will noticeably affect a pedal’s responsiveness.
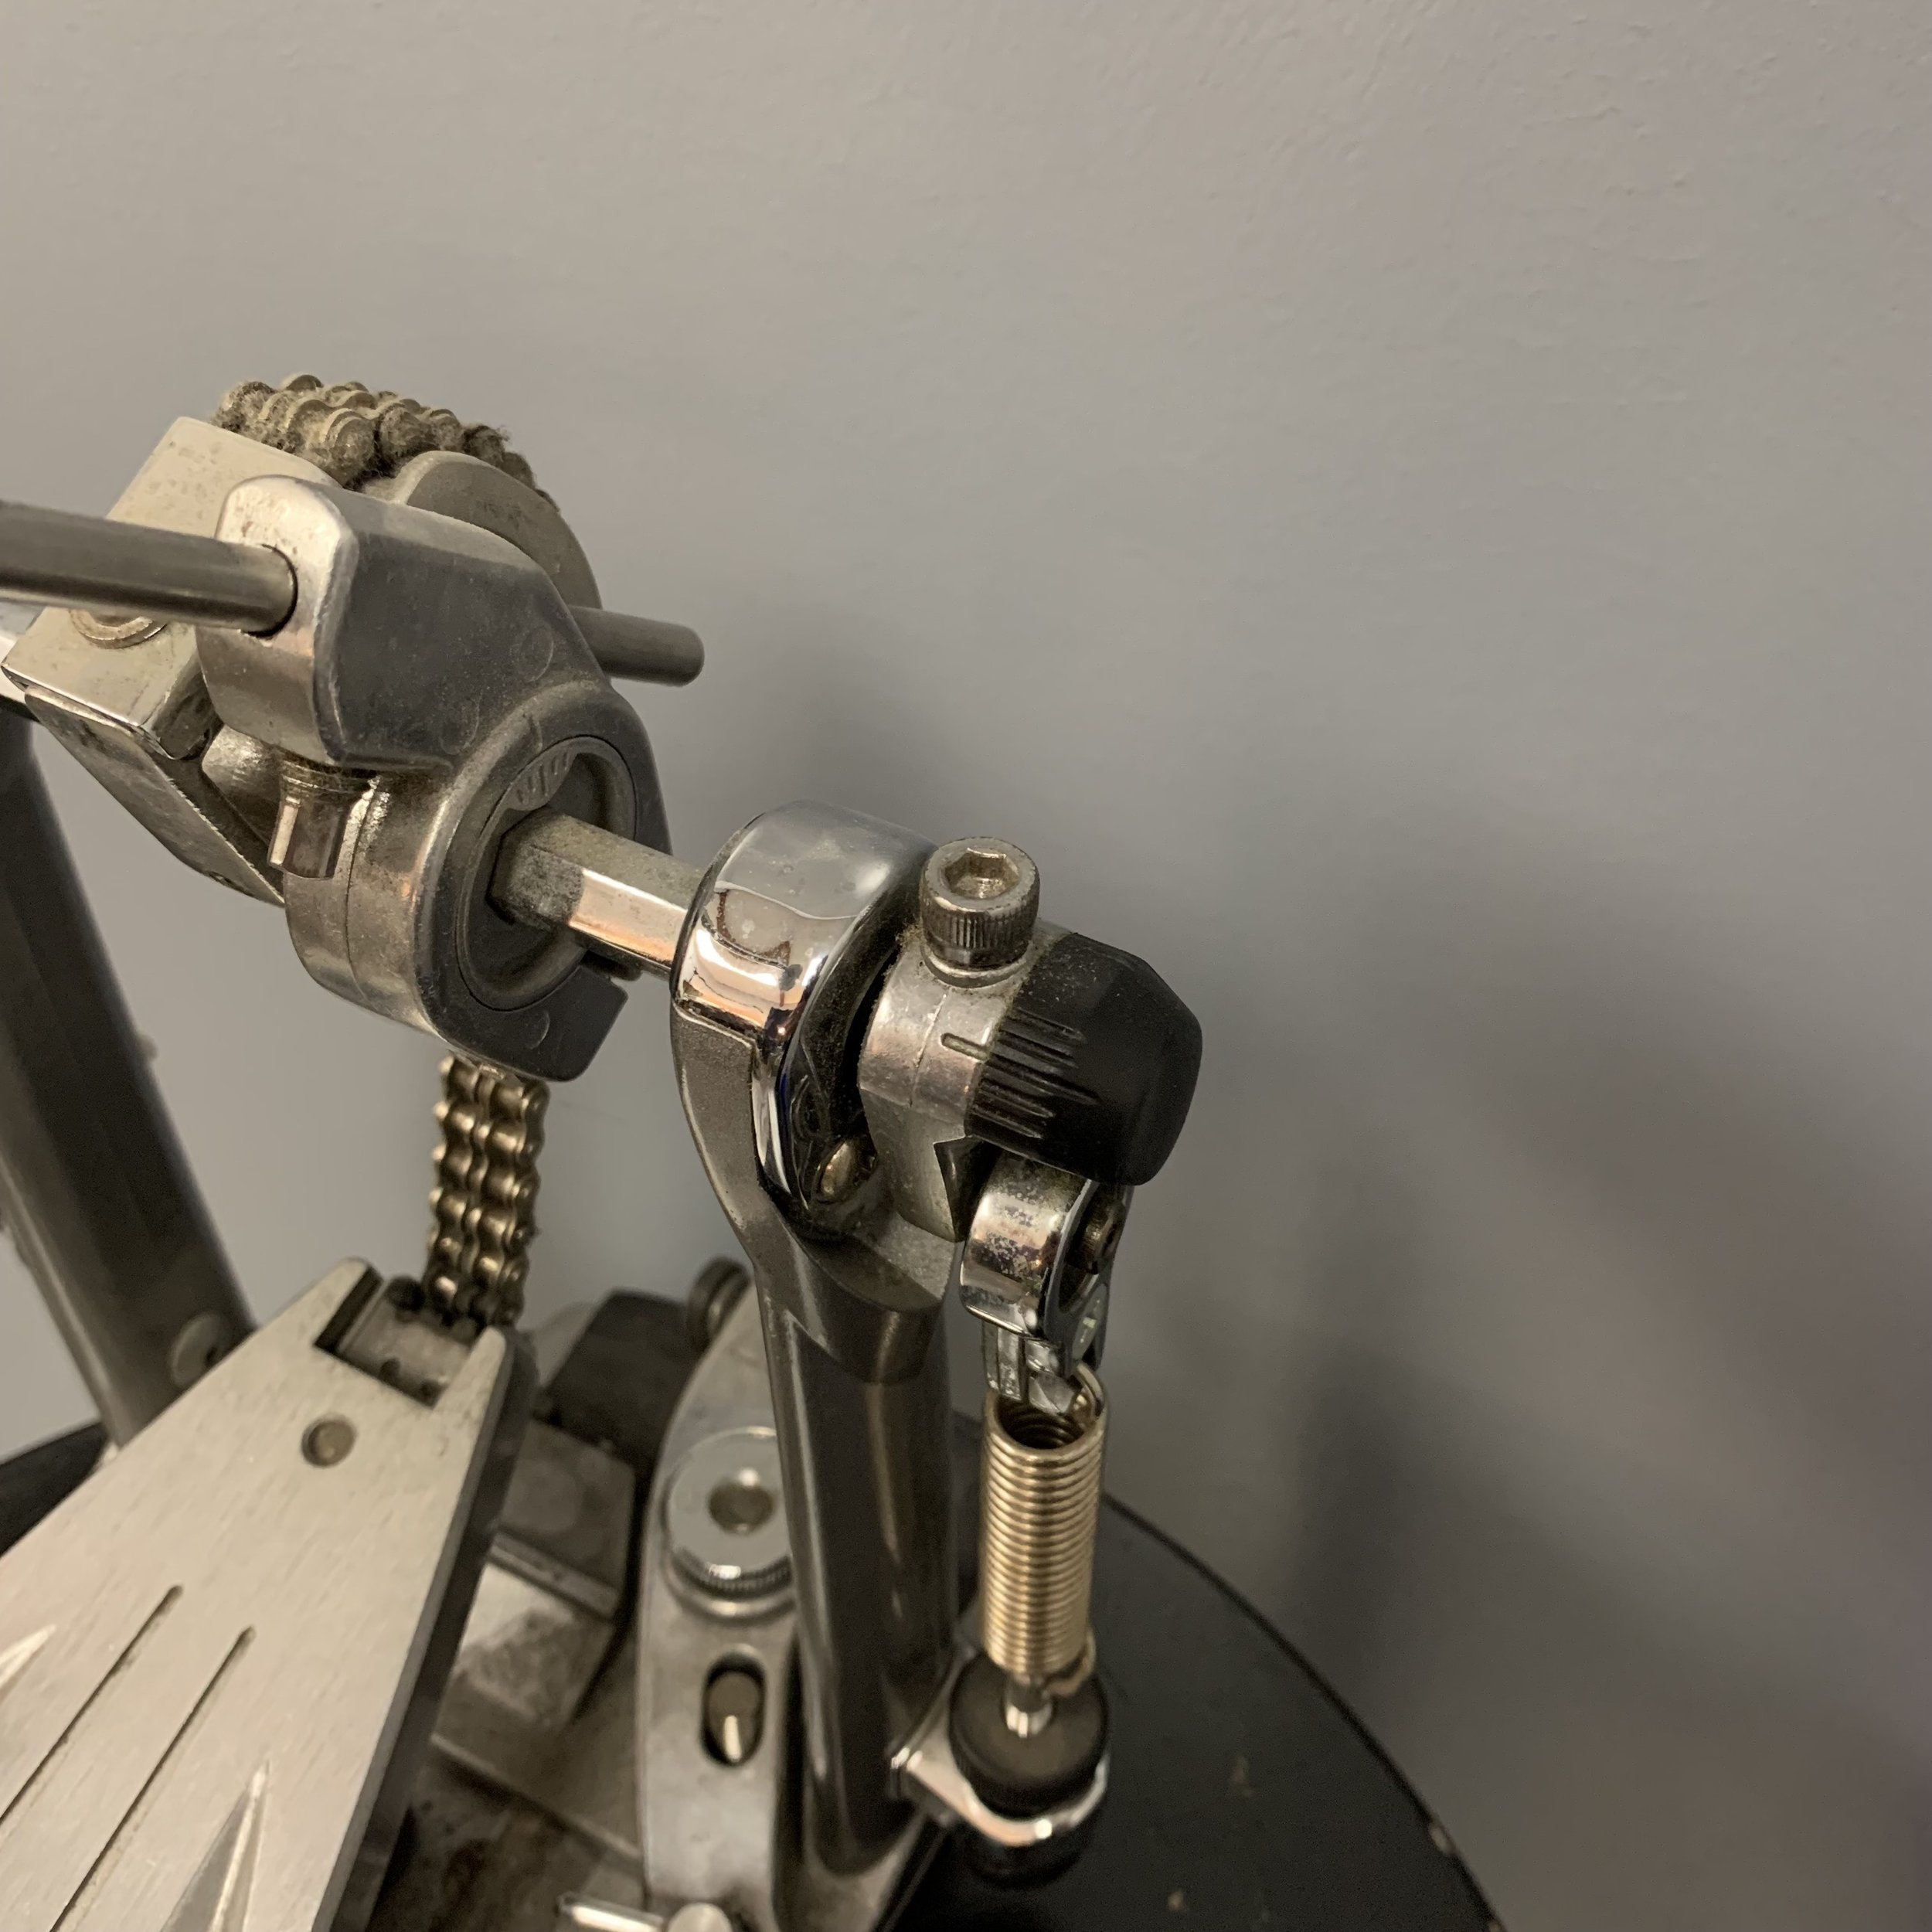
Beater angle adjust - allows users to adjust the distance between the beater and the bass drum when the beater is in a resting position (no pressure on the pedal). A greater distance results in more power at the cost of speed.
Beater height adjust - allows the user to adjust the height of the beater (pretty self-explanatory). A higher beater allows for more power, while a lower beater more easily allows for higher speeds.

A closeup of the cam.
Cam - the crucial component that binds the pedal drive to the footboard (pictured to the right). The size and shape of a cam factors into how smooth a pedal feels when played. This pedal has Tama’s “Rolling Glide” cam, which has a smooth, even feel to it.
Footboard - the interface between the user’s foot and the beater. The length of the footboard will vary depending on the particular pedal model. The above pedal has a relatively long footboard compared to others, which some drummers may find preferable.
Footplate - a single piece of metal that all of the other components attach to. While not all pedals use a footplate (especially some cheaper models), footplates add a lot of stability to their overall feel.
Heelplate - a small block containing a hinge, which anchors the footboard into place. It also works as a place to rest your heel!
Hoop clamp - a small clamp that secures the pedal to the hoop of the bass drum.
Hoop clamp adjust - a screw used to tighten and loosen the hoop clamp (also pretty self-explanatory).
Pedal drive - the component that attaches the footboard to the cam. Most pedals use a chain, but often allow users to swap out for a strap if preferred. Some pedals use a direct drive, which is a solid piece of metal connecting the footboard to the cam. The above pedal has a dual chain drive, allowing the footboard very little side-to-side play. Cheaper pedals often have a single chain drive, which can feel less stable compared to other drives.
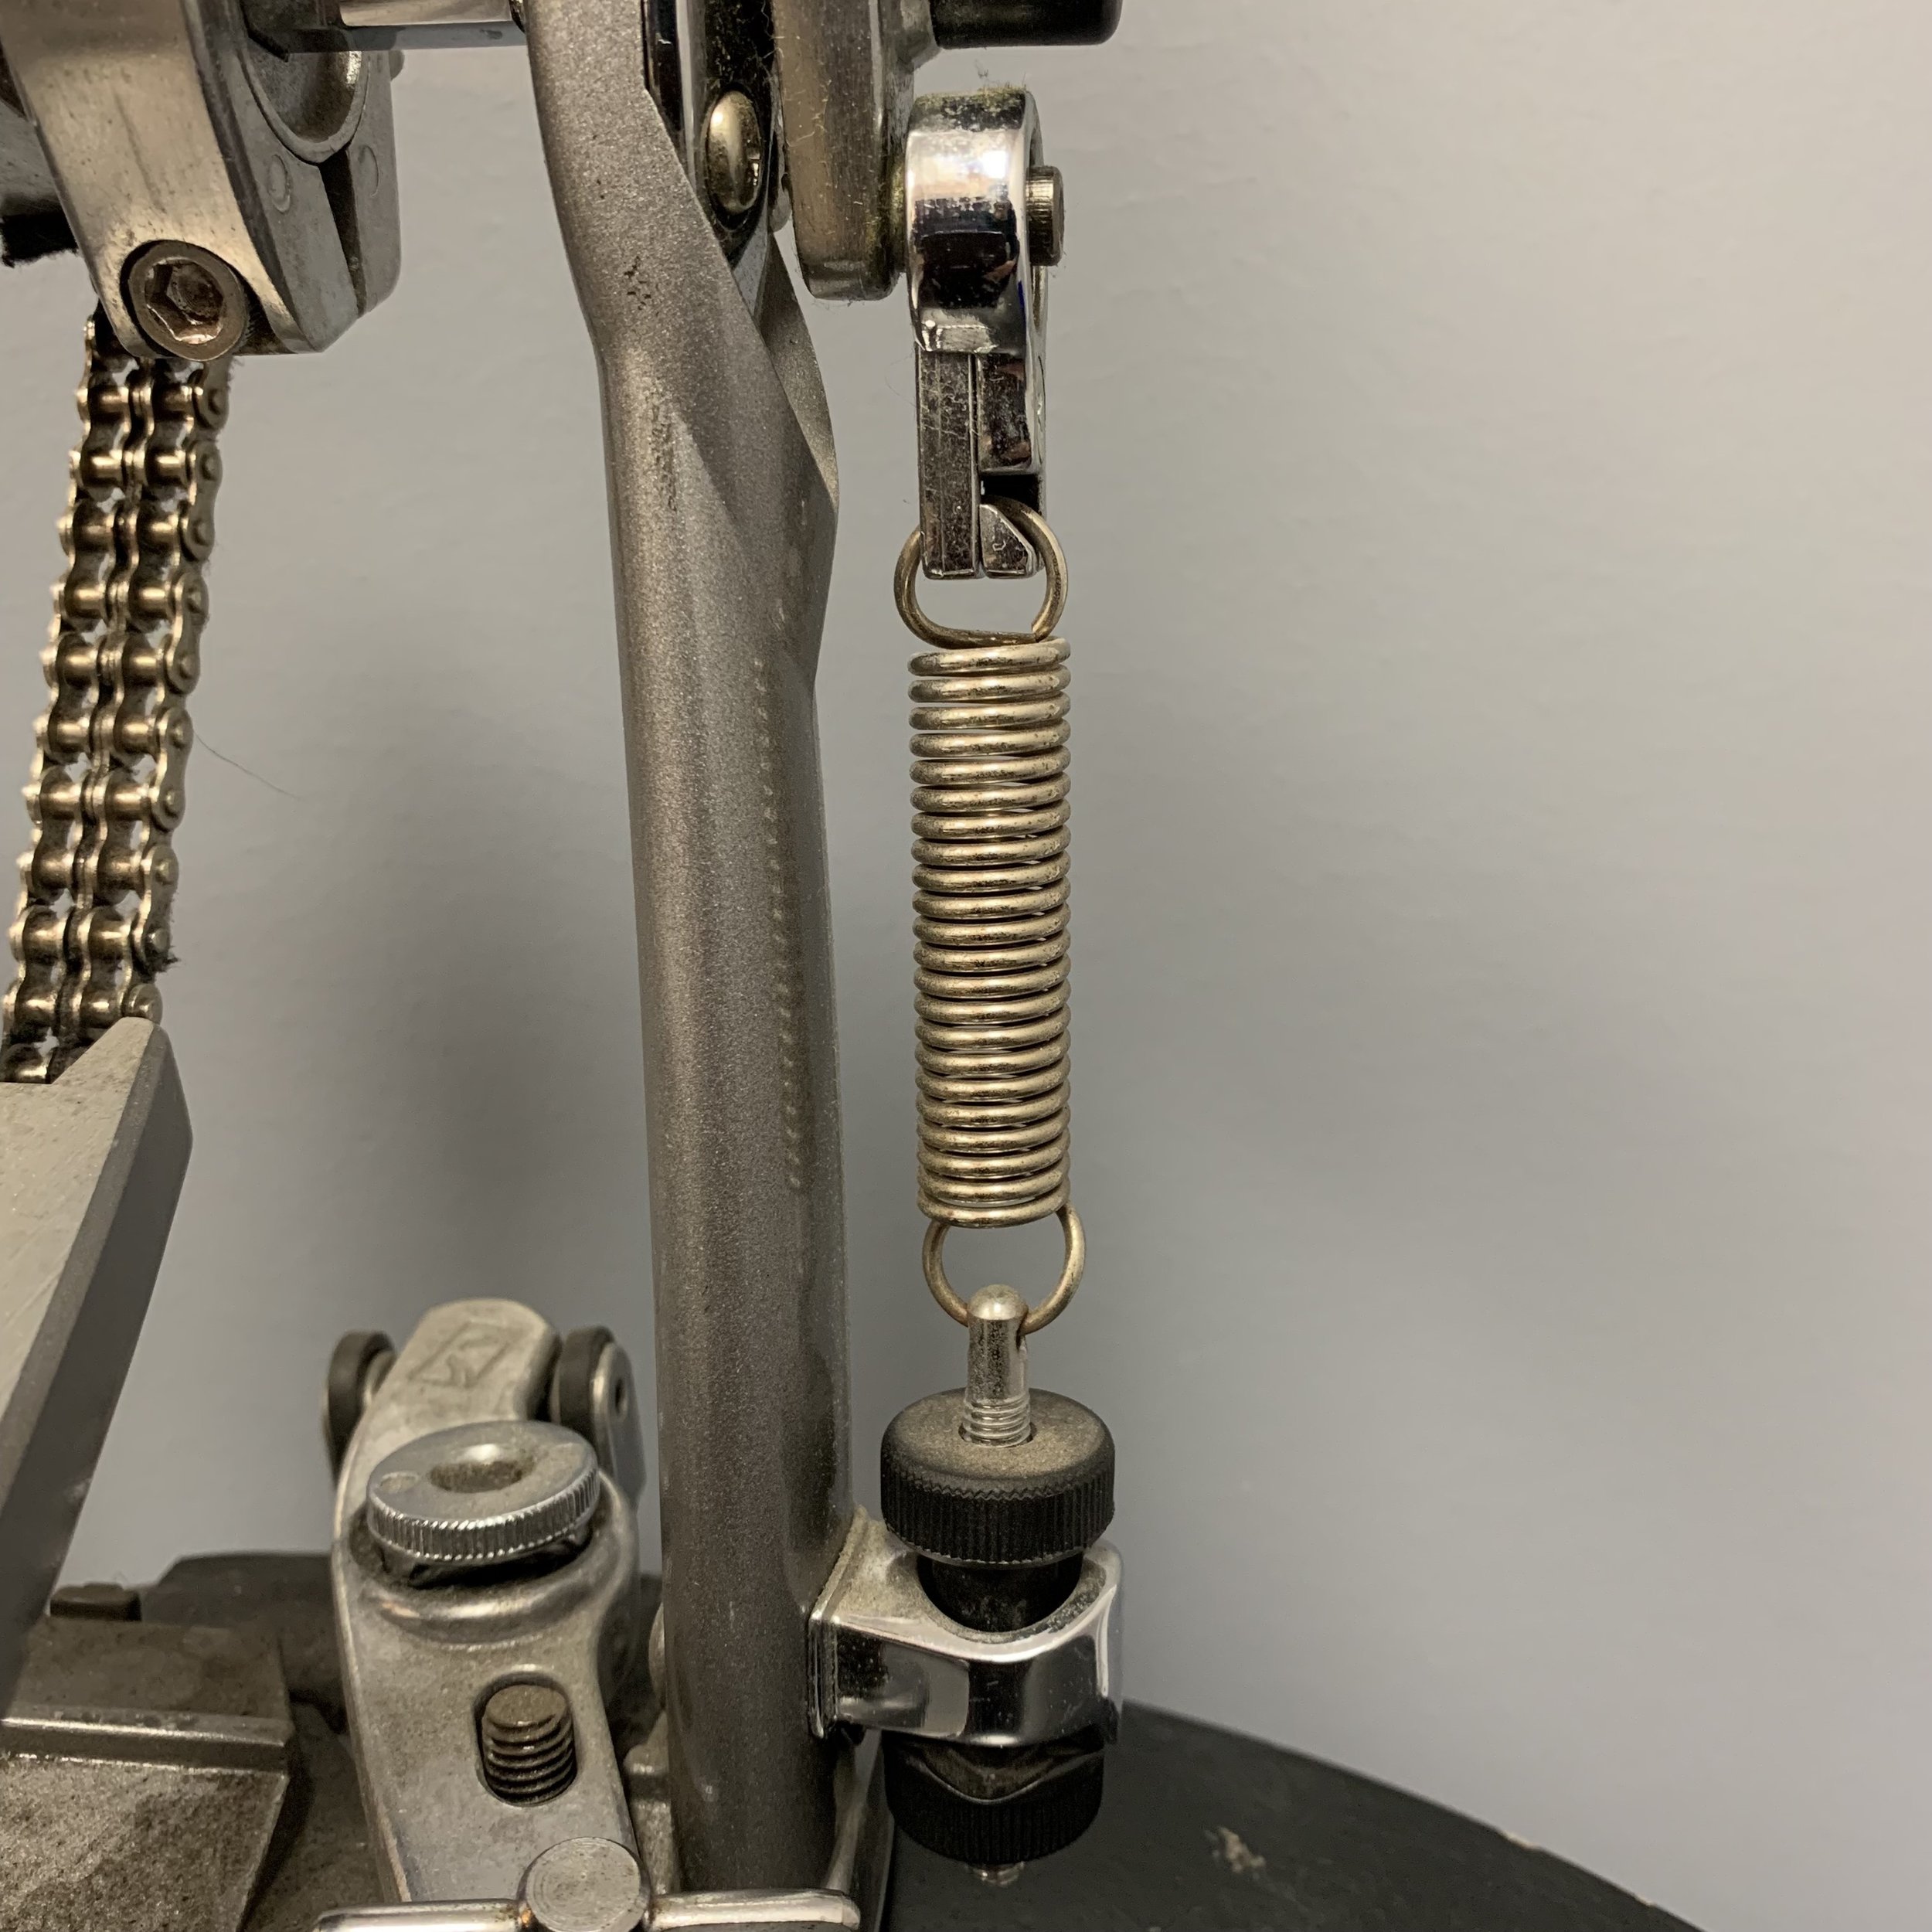
Rocker - a small component containing a bearing that attaches the spring to the rest of the pedal’s mechanics.
Rocker shaft - a hexagonal crossbar that behaves as a hub for the cam and beater.
Spring - arguably the most important component, the spring returns the beater to a resting position away from the bass drum. The amount of tension on the spring has a very noticeable impact on a pedal’s responsiveness. Higher tensions result in a twitchier feel, while lower tensions allow for more glide in a pedal’s movements.
Spring tension adjust - the knob used to adjust the amount of tension placed on the spring (also quite self-explanatory...). Just remember: righty tighty, lefty loosey!
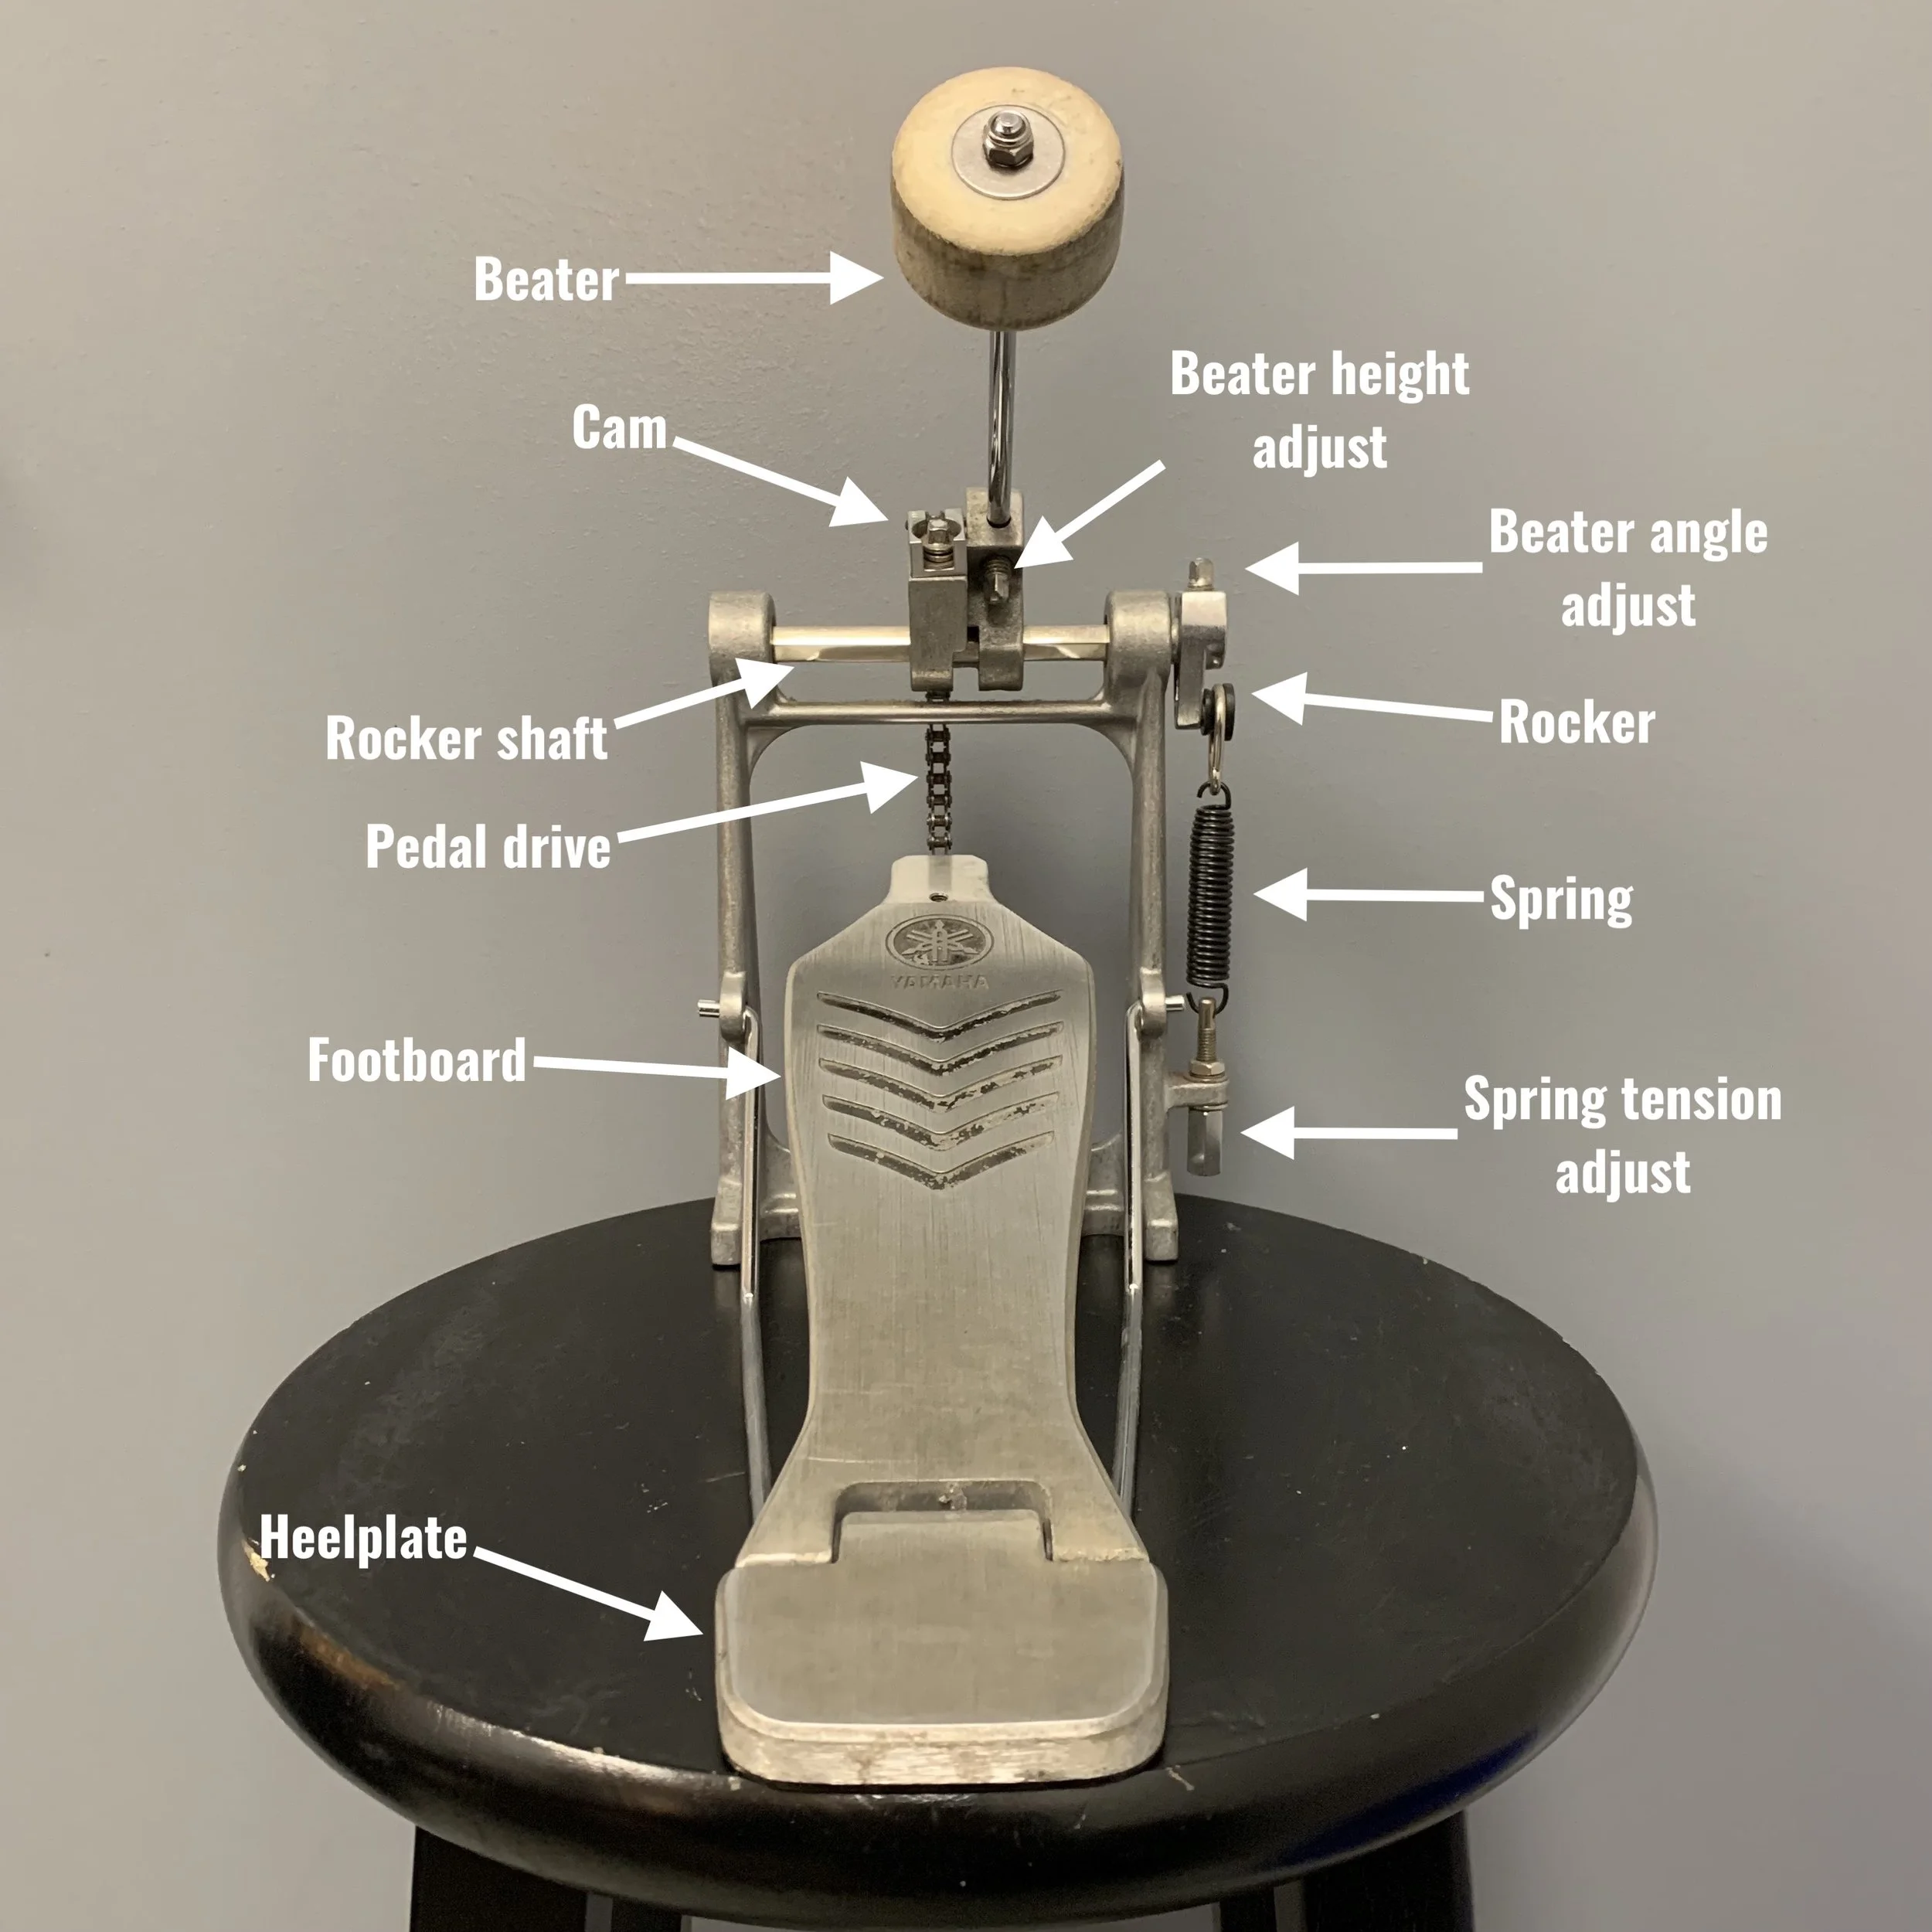
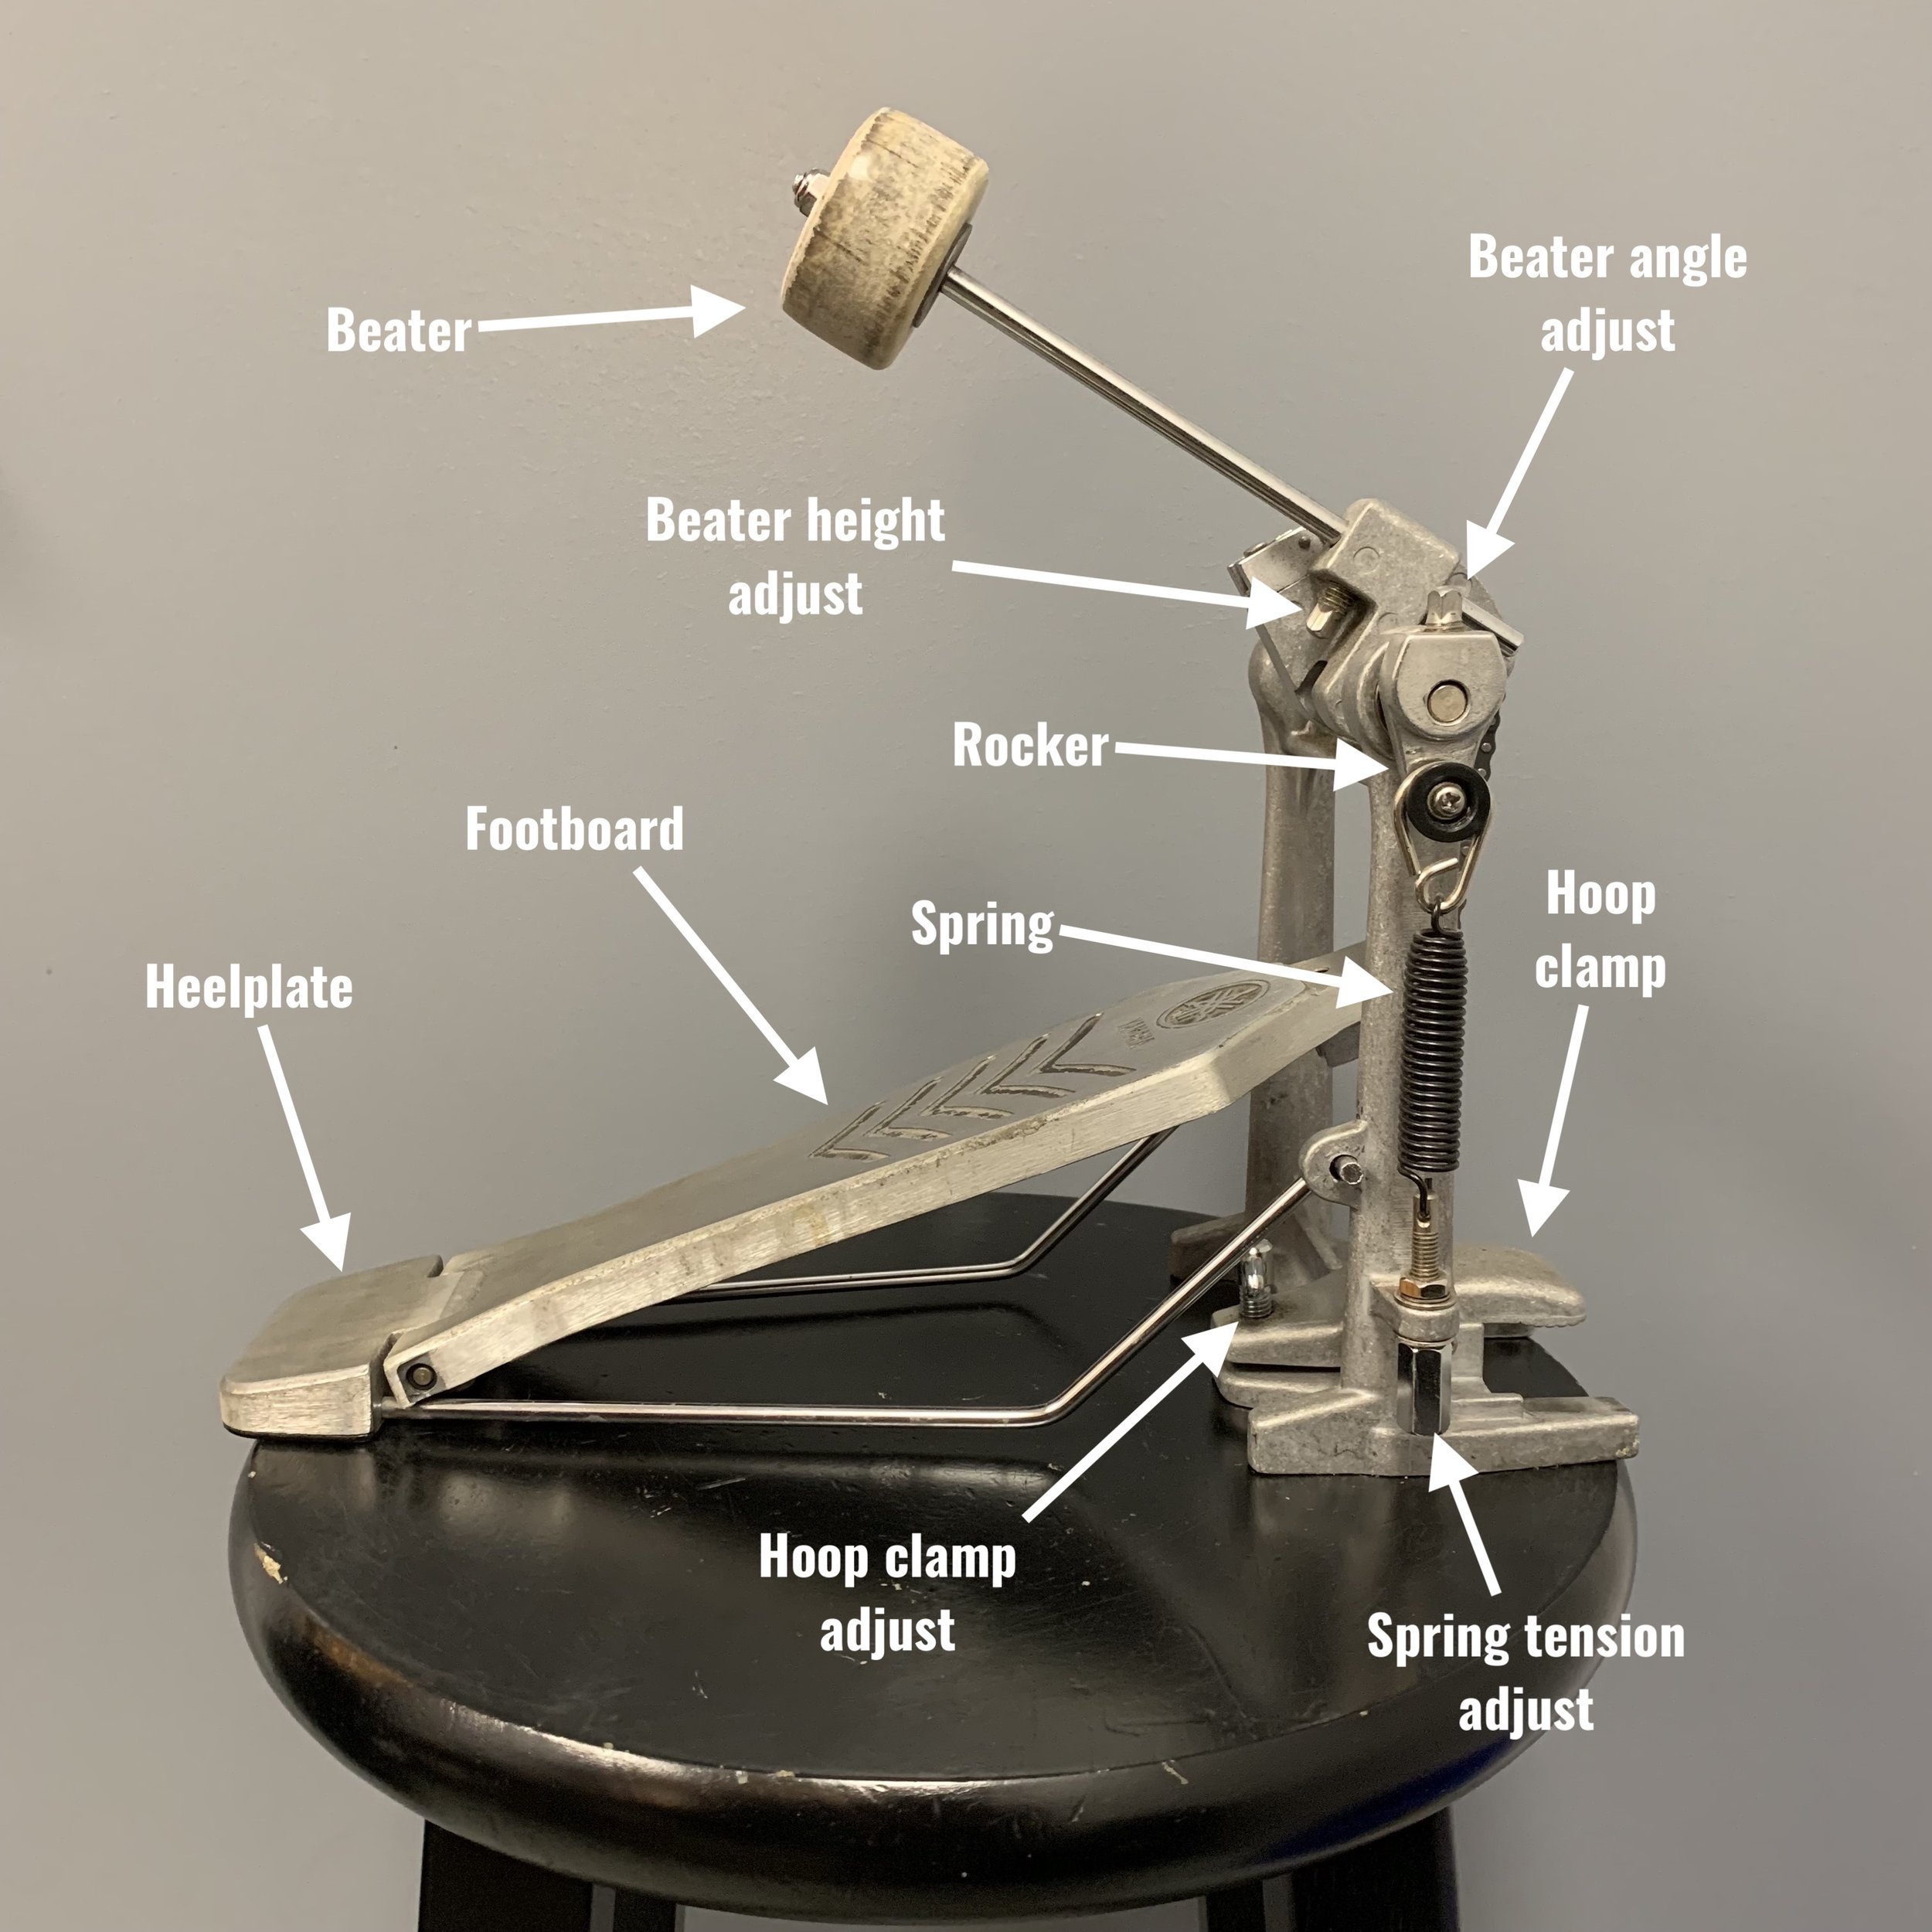
For the sake of comparison, another (cheaper) bass drum pedal is shown below with all of its components labeled. While it lacks a solid footplate, has a shorter footboard, and uses a single chain drive, it has all of the same components as the Tama Speed Cobra.
Dialing In
Most bass drum pedals take some fine tuning to get them to feel good and respond properly. If you think your pedal feels kind of weird and it’s getting in the way of your playing, there are 3 components you should check on and consider tweaking: spring tension, beater angle, and beater height.
Spring Tension
The amount of tension placed on the spring (pictured below left) impacts how much pressure you’ll need to place on the pedal to execute a stroke. It also determines how quickly the beater will return to a resting position when you release pressure from the pedal. A tighter spring results in a more responsive and twitchy feel, which is helpful for playing strokes in rapid succession, but may make it a bit more challenging to play at a wider range of dynamics. A spring with less tension will give the pedal more of a controlled gliding feel, but may react a bit sluggishly if you’re trying to play faster rhythms. There isn’t any “correct” spring tension - it purely comes down to personal preference. Drummers that play a lot of rock or metal music generally use a higher spring tension to play with more power and speed, while drummers that play a lot of jazz may have a lighter tension to more easily access a wider dynamic range. Try our various spring tensions to find out what feels most comfortable for you!

Beater Angle
The beater angle (adjustment screw pictured above in the middle) refers to the angle of the beater relative to the bass drum’s batter head when the beater is at its resting position. Generally, a 45 degree angle is a nice balance point between speed and power. The further back the beater rests, the more power you’ll get in each stroke since the beater needs to travel a greater distance to reach the head. A shallower angle makes it easier to play more quietly, but may restrict the ability to play faster or utilize different techniques on the pedal.
Beater Height
The beater height (adjustment screw pictured above to the right) refers to the distance between the beater and the rocker shaft. An often overlooked setting on bass drum pedals, the beater height also has a large impact on how a pedal feels, especially depending on the weight of the beater. A greater beater height gives access to more power, but at the cost of speed and responsiveness. A lower beater height will give the pedal a quicker, snappier feel, but at the cost of power. In general, the beater should strike slightly off center of the batter head.
These three settings in conjunction with one another should be plenty to get your kick pedal feeling smooth and comfortable for your play style. Try exploring different combinations of settings to find what feels best for you, such as a medium/high spring tension + 45 degree angle + high beater height (striking above center of the batter head), or a low spring tension + 30 degree angle + medium beater height (striking only slightly above center of the batter head). Just keep in mind there are no “correct” settings. It may take a while to discover what actually feels right to you so just be patient!